
Fancy trying your hand at DIY bedroom decor? You can be brave in your own room because, after all, it's a place that guests seldom visit, and when they do, it's usually only to give them a quick tour around your space. So use this opportunity to get creative and infuse your interior personality into this private space.
Bedroom furniture can be expensive, and with many of us wanting to do up our bedrooms, delivery and stock availability lead times can be longer than we'd like, so instead of leaving it at the peril of homeware companies, create your own DIY bedroom fixtures.
By doing this, you will know for certain that your bedroom ideas will fit through your door (no pivoting up the stairs) and will complement the rest of your scheme. Plus, furniture colors – no matter how similarly named – can vary in pigment and under different lighting conditions, especially if you're trying to purchase something online, so by choosing the same paint, or by using the same material for your DIY projects, you can avoid mismatched fixtures and furnishings.
DIY bedroom decor
'You don’t have to spend a fortune to have a bedroom that looks like it belongs on the pages of a New York magazine or West Elm’s social media account,' says Andra DelMonico, contributing author, Trendey
'With a bit of creativity and ingenuity, you can build and make your own furniture and decor. As a result, your bedroom will not only look stylish, but it will be unique to you. Since it’s your bedroom, this is the perfect place to express your personal style and taste.'
1. Luke Wells' Ikea hack
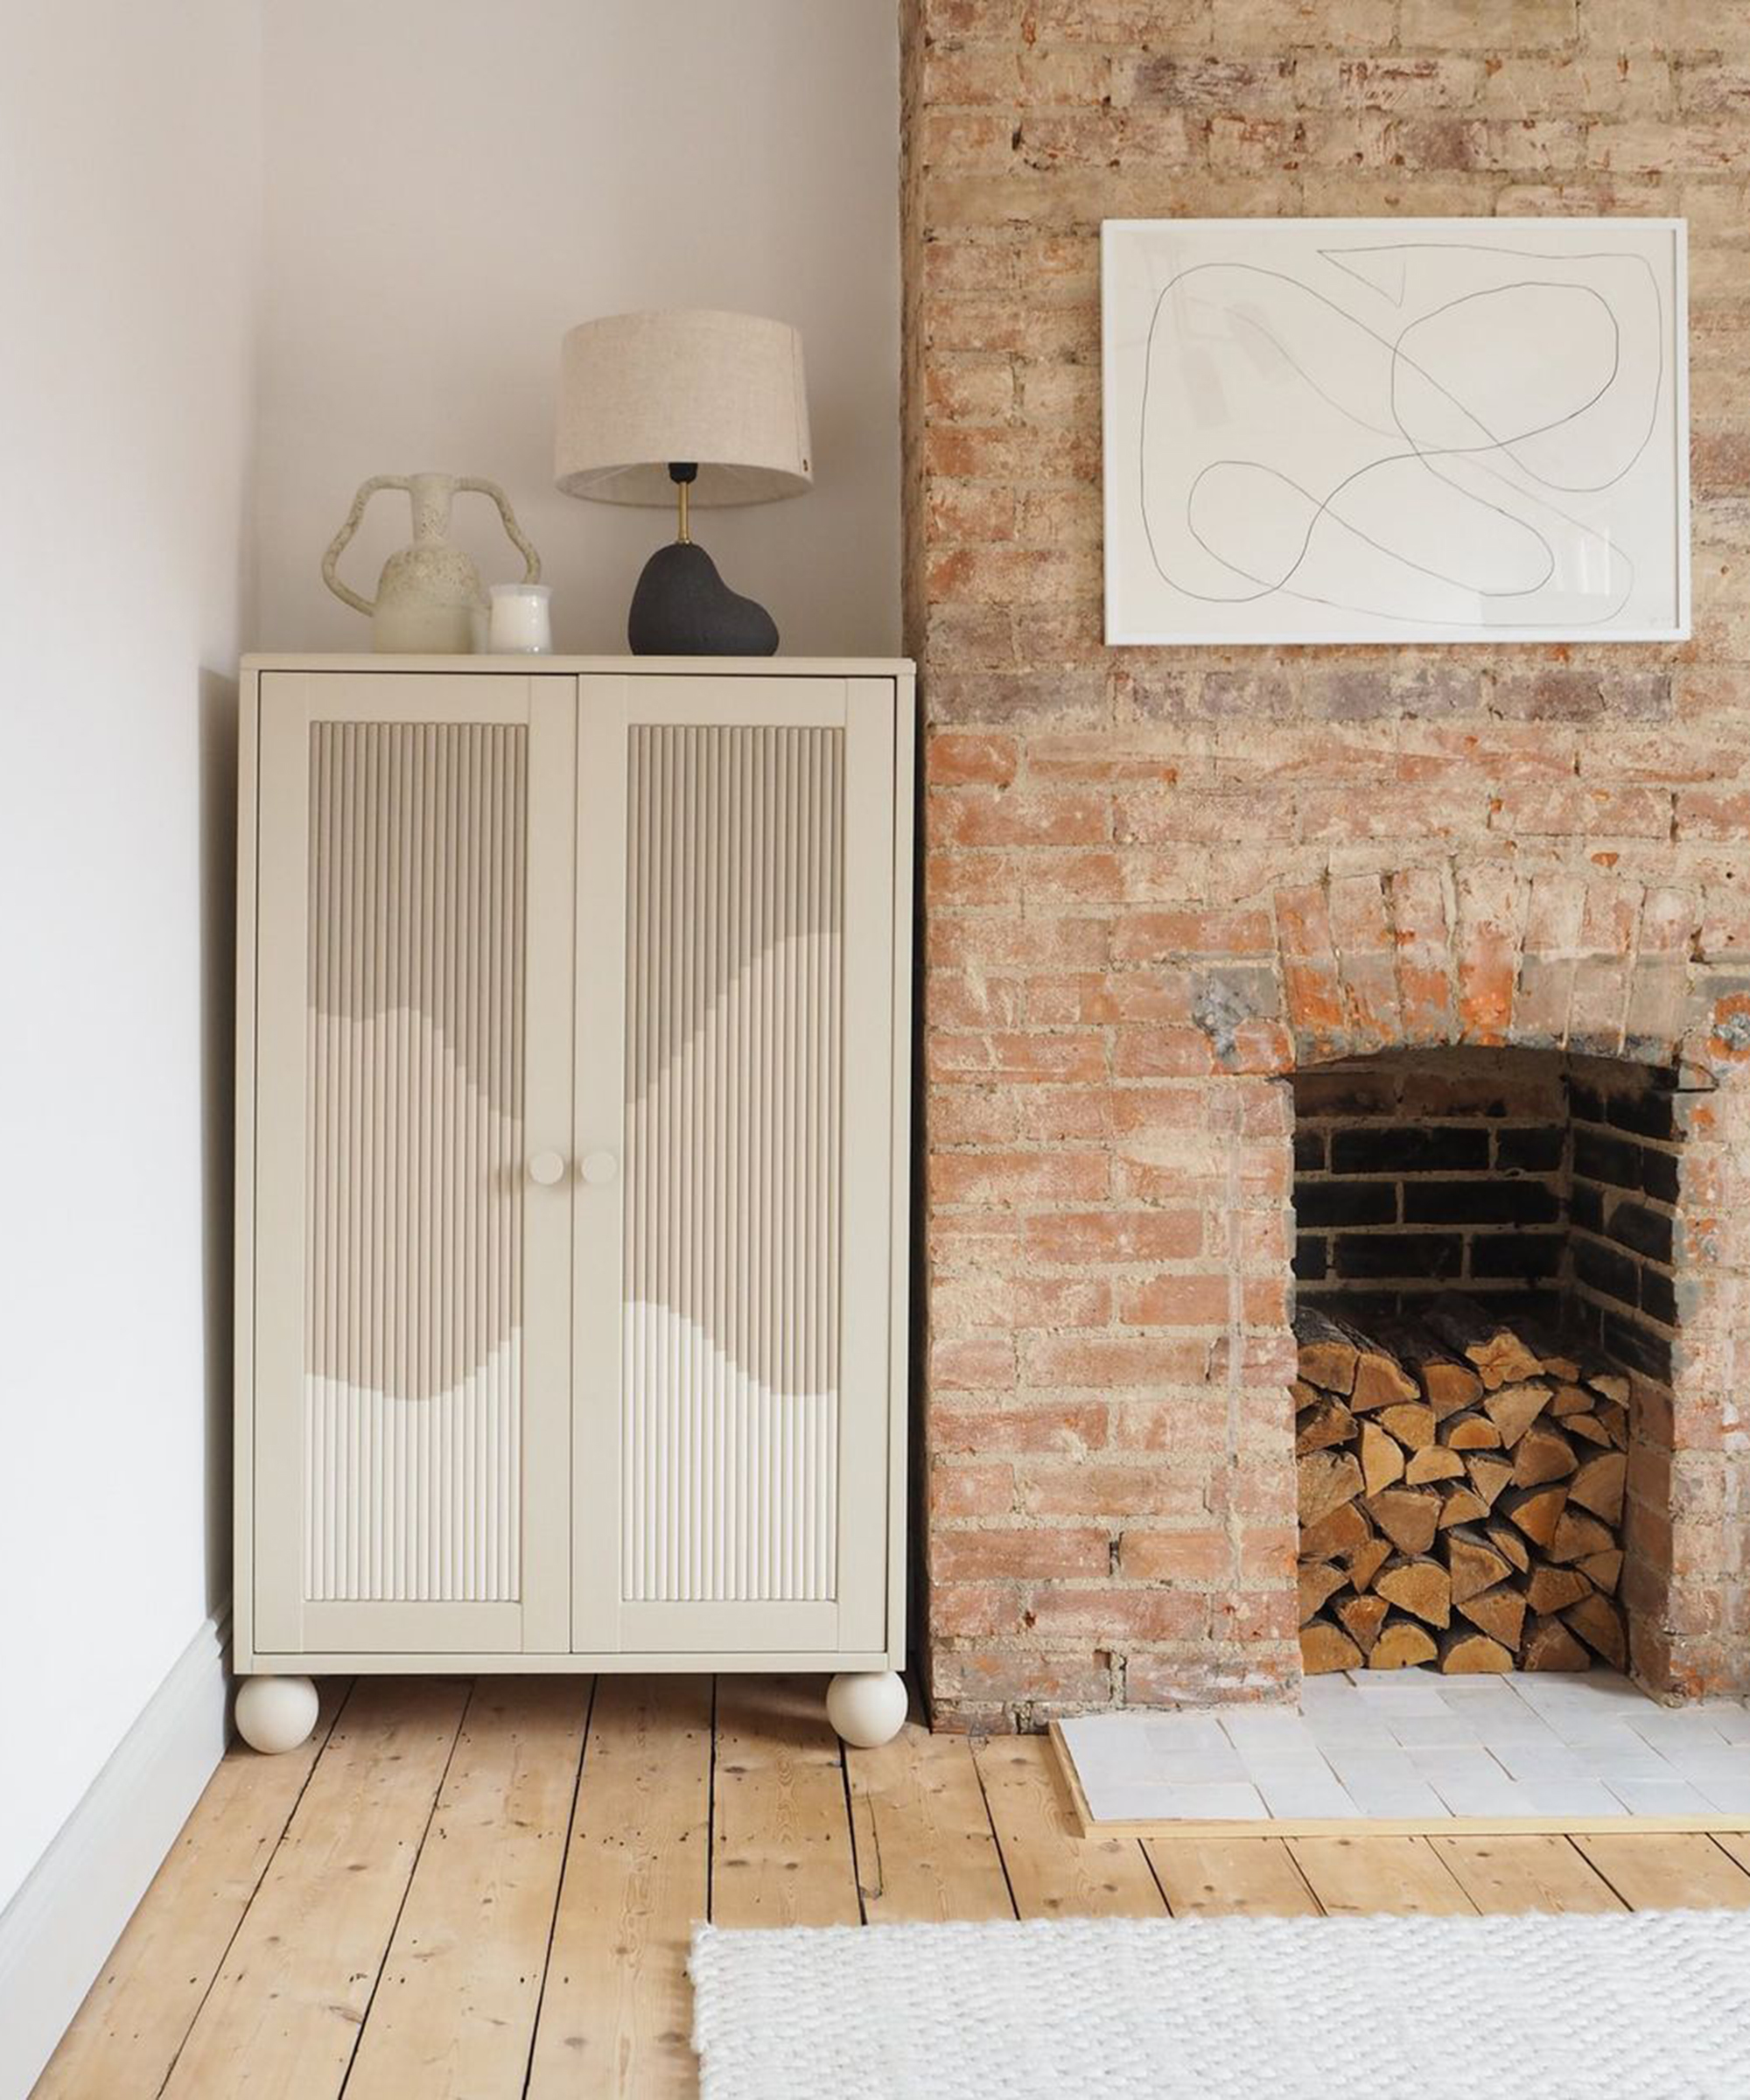
'I've been looking for a new cabinet for the bedroom for ages, but could not find anything that was exciting me.' says interior stylist, Luke Arthur Wells.
'Ikea’s Havsta cabinet was the only thing I could find that was around the size and shape I wanted, but it’s honestly just too plain. I bought it anyway and decided I’d try to figure out something to do with it. This one took a bit of forced thinking, but I eventually came up with a concept.'
You will need:
- Ikea HAVSTA cabinet
- Cabinet legs of your choice (Luke used these Pretty pegs legs)
- COAT paint in Well Grounded eggshell finish (Luke's very own collab shade.)
- Approximately 40 half dowels - we like these from Woodpeckers on Amazon
- Paint tray
- Hand saw
- Painters' tape
- Clear matt wood varnish
How to:
- Measure the inset of the cabinet door and cut half dowels to size. You’ll need quite a lot, but you won’t know exactly how many until you’ve got them all cut and on the door.
- Place all the dowels roughly on the door and start to mark out your pattern with a pencil.
- Using a fine painter’s tape, tape over your lines. Luke started on the outside of each line so that I could paint the center section first.
- Choose your color palette! Luke's was a mix of random leftovers but aim for all the same finish, preferably eggshell.
- Paint the center section first. You’ll need to be careful and do a few coats. He raised his off the floor with a few pieces of scrap timber.
- Once the first section is painted and dried, remove the tape. Re-tape over the now painted section, paying close attention, and paint the other two ends. Two coats again please!
- Once dried, we can get to sticking. Start on the inside edge, and if you find that the dowels don’t fit exactly, you’ll need to sand down the edge on the last dowels to be fixed. He used spray adhesive because it’s quick and you won’t want these dowels shifting around while they dry.
- Once stuck, give the whole cabinet a once over with a clear, matte varnish.
If you love what Luke has done, chances are you'll love these other Ikea hacks too.
2. Home Depot's DIY closet organizer

'Being organized gets rid of clutter and makes the most of your closet space. Closet organization helps you streamline your morning routine,' says Sarah Fishburne, director of trend and design, The Home Depot.
'A closet system can also help you store items like bedding with ease. Making your own closet organizer can be a budget-friendly alternative to a pre-assembled unit.'
You will need:
- Measuring tape
- 3/4-inch plywood
- Circular saw - this SKIL-branded saw is cheap and comes with good Amazon reviews
- Stud finder - over 14.5k reviews can't be wrong?
- Wood screws or finishing nails
How to:
- Measure the closet space: Start by measuring accurately. You will install your finished DIY closet system on shelf supports. Measure the back wall and two side walls of your closet space. Use these measurements to determine the length of the shelf supports. Tip: Deduct 1 1/2 inches from the length of the back wall shelf support measurement to account for the 3/4-inch thickness of each side wall support.
- Measure pieces for closet organizer: You'll use 3/4-inch plywood to make this closet organizer. Measure out: Six 1-inch x 3-inch boards. The lengths will be based on the back and side wall measurements in Step 1. 11 7/8-inch wide long closet shelves. Use the length that fits the width of your closet in Step 1. Six 11 7 /8-inch square shelves for the central unit. Six 11 7 /8-inch square shelves for the central unit.
- Cut shelf supports: Cut the six 1-inch x 3-inch shelf supports you measured out in Step 2. Cut these pieces for the top and bottom of the closet walls.
- Use a circular saw to cut the following pieces you measured out in Step 2: Six 11 7/ 8-inch square shelves for the central unit. Six 1-inch x 3-inch boards with lengths based on the back and side wall measurements in Step 1. Two 11 7 /8-inch wide closet shelves with lengths based on the closet width measurement in Step 1.
- Attach shelf support to wall: Your shelf support pieces will bear most of the weight of the central shelf unit. It's important to attach them to the studs. Use a stud finder to find the studs in the back wall and the two side walls of your closet space. Attach the supports for the top shelf to the walls with their top edges 84 inches above the floor using wood screws. Attach the supports for the bottom shelf to the wall with their top edges 76 inches above the floor using wood screws.
- Assemble the central unit: Use wood screws or finishing nails to put the center of the organizer together. Space the shelves evenly. Or choose spacing based on the height of the items you plan to store. Leave the top and bottom of the unit open.
- Position the central unit in the closet: Position the central shelf unit to be the middle of the DIY closet system. Cut excess wood out with a hand saw so the unit fits into the support board. Take your time here and avoid removing too much wood.
- Install long shelves: Lay one of the long shelves on the lower shelf supports. It will be on top of the central shelf unit. Attach each long shelf with wood screws or 6d finishing nails. Tip: Add metal shelving brackets in the corners of the long shelves for extra support.
Decided against DIY? Browse our pick of the best closet organizers.
3. DIY bedroom picture frame molding
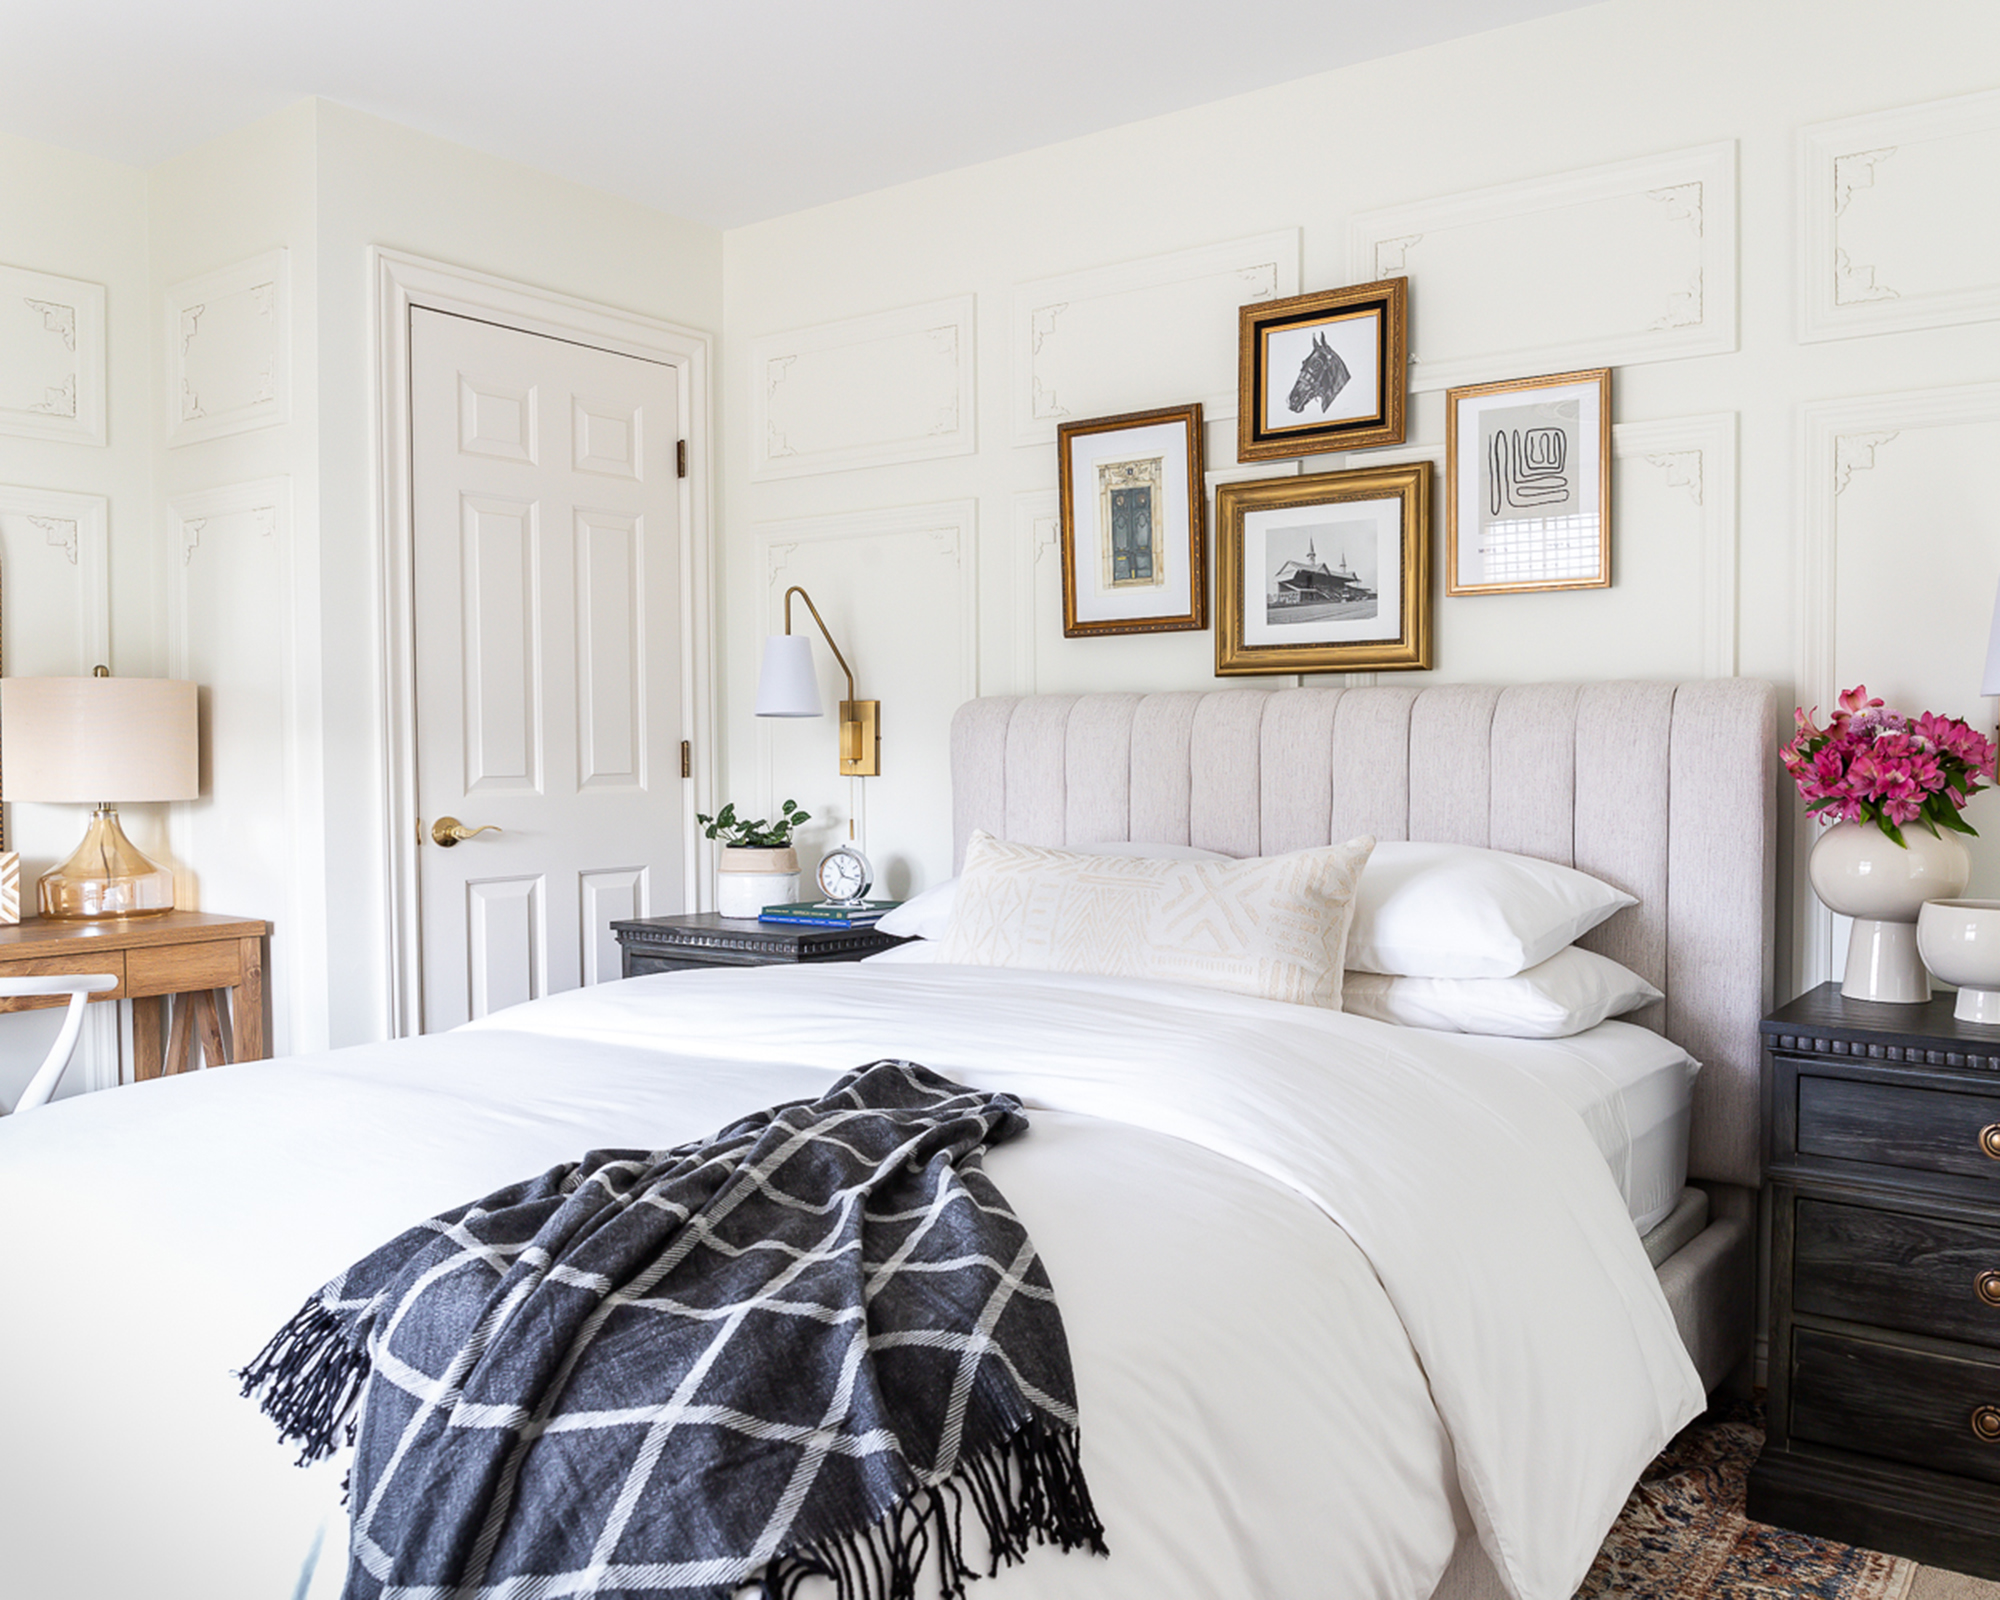
If you have a bedroom that could use a little more character, add a touch of European elegance with this DIY picture frame molding project from Jen Woodhouse, self-taught carpenter, and contributor on Arrow Fastener.
- Arrow PT18G pneumatic brad nailer - nail the job with help from Amazon
- Tape measure
- Pencil
- 48″ level
- Laser level
- Compound miter saw
- Caulk gun - this gun by Newborn at Amazon has over 11,000 reviews
- Safety goggles - Leopard print protective eyewear? Yes please.
- Hearing protection - This 3M product has over 26,000 reviews on Amazon
- Dust mask
- Arrow brad nails
- Cardboard
- Primed pine casing
- Construction adhesive
- Silicone trim sealant - seal the deal with JB-Weld at Amazon
- Painter’s putty - you won't be stuck for choice at Amazon
- Ornamental corner moldings (optional)
- Wall paint of your choice
- To get started, it’s important to plan your layout. For this project, Jen landed on four large picture frame boxes centered on the wall with four small boxes at the top and 4″ spacing everywhere. She created a 4″ square template out of cardboard to use as a reference point. For example, starting on the main focal wall, she placed the template in the bottom-right corner – where the baseboard and door casing meet – and made a mark. That way she knew she had 4″ from the baseboard and 4″ from the door casing, and from that she could start marking where each box should go. This little template came in super handy.
- Now that you have a game plan in place, it’s time to transfer it to the room, starting in the corner, mark with the 4″ template. She used a level and drew out all the boxes on the walls, then double-checked our work with a laser level. Be sure to draw the picture frame boxes level and don’t go off of the baseboards or ceilings, as these are often not level, square, or true.
- Next, it’s time to hunker down in the workshop to make your mitered cuts! She set the miter saw deck to 45° and started making the cuts. It’s a good idea to “sneak up on the cut,” meaning you should cut your pieces long and then shave off a little bit at a time until you get the exact measurement you need. This lowers your chances of making a mistake and cutting a piece too short. Both ends of each piece are mitered so that they’re not parallel. That way when two pieces are put together, they form a picture frame corner. After all the cuts were made, we dry-fit the pieces together to see how they would look. You should cut the longest pieces first to ensure you’re not wasting any material.
- To attach the molding to the wall, she used a construction adhesive and brad nails. First, she fastened the vertical pieces all around the room with the adhesive by simply lining them up along the pencil marks. Then she used the PT18G pneumatic brad nailer to secure them to the wall. If you’re adding ornamental corner moldings to your frames, now’s the time to nail those in place.
- After installing the remaining trim, we caulked all the seams and joints with silicon trim sealant and filled the nail holes with painter’s putty. Then a few coats of fresh paint went up on the walls and voilà!
Don't want to (or have the budget to) invest in a saw? Learn how to DIY picture frame molding without this cutter.
4. Jeanie Simpson's stenciled coat hooks
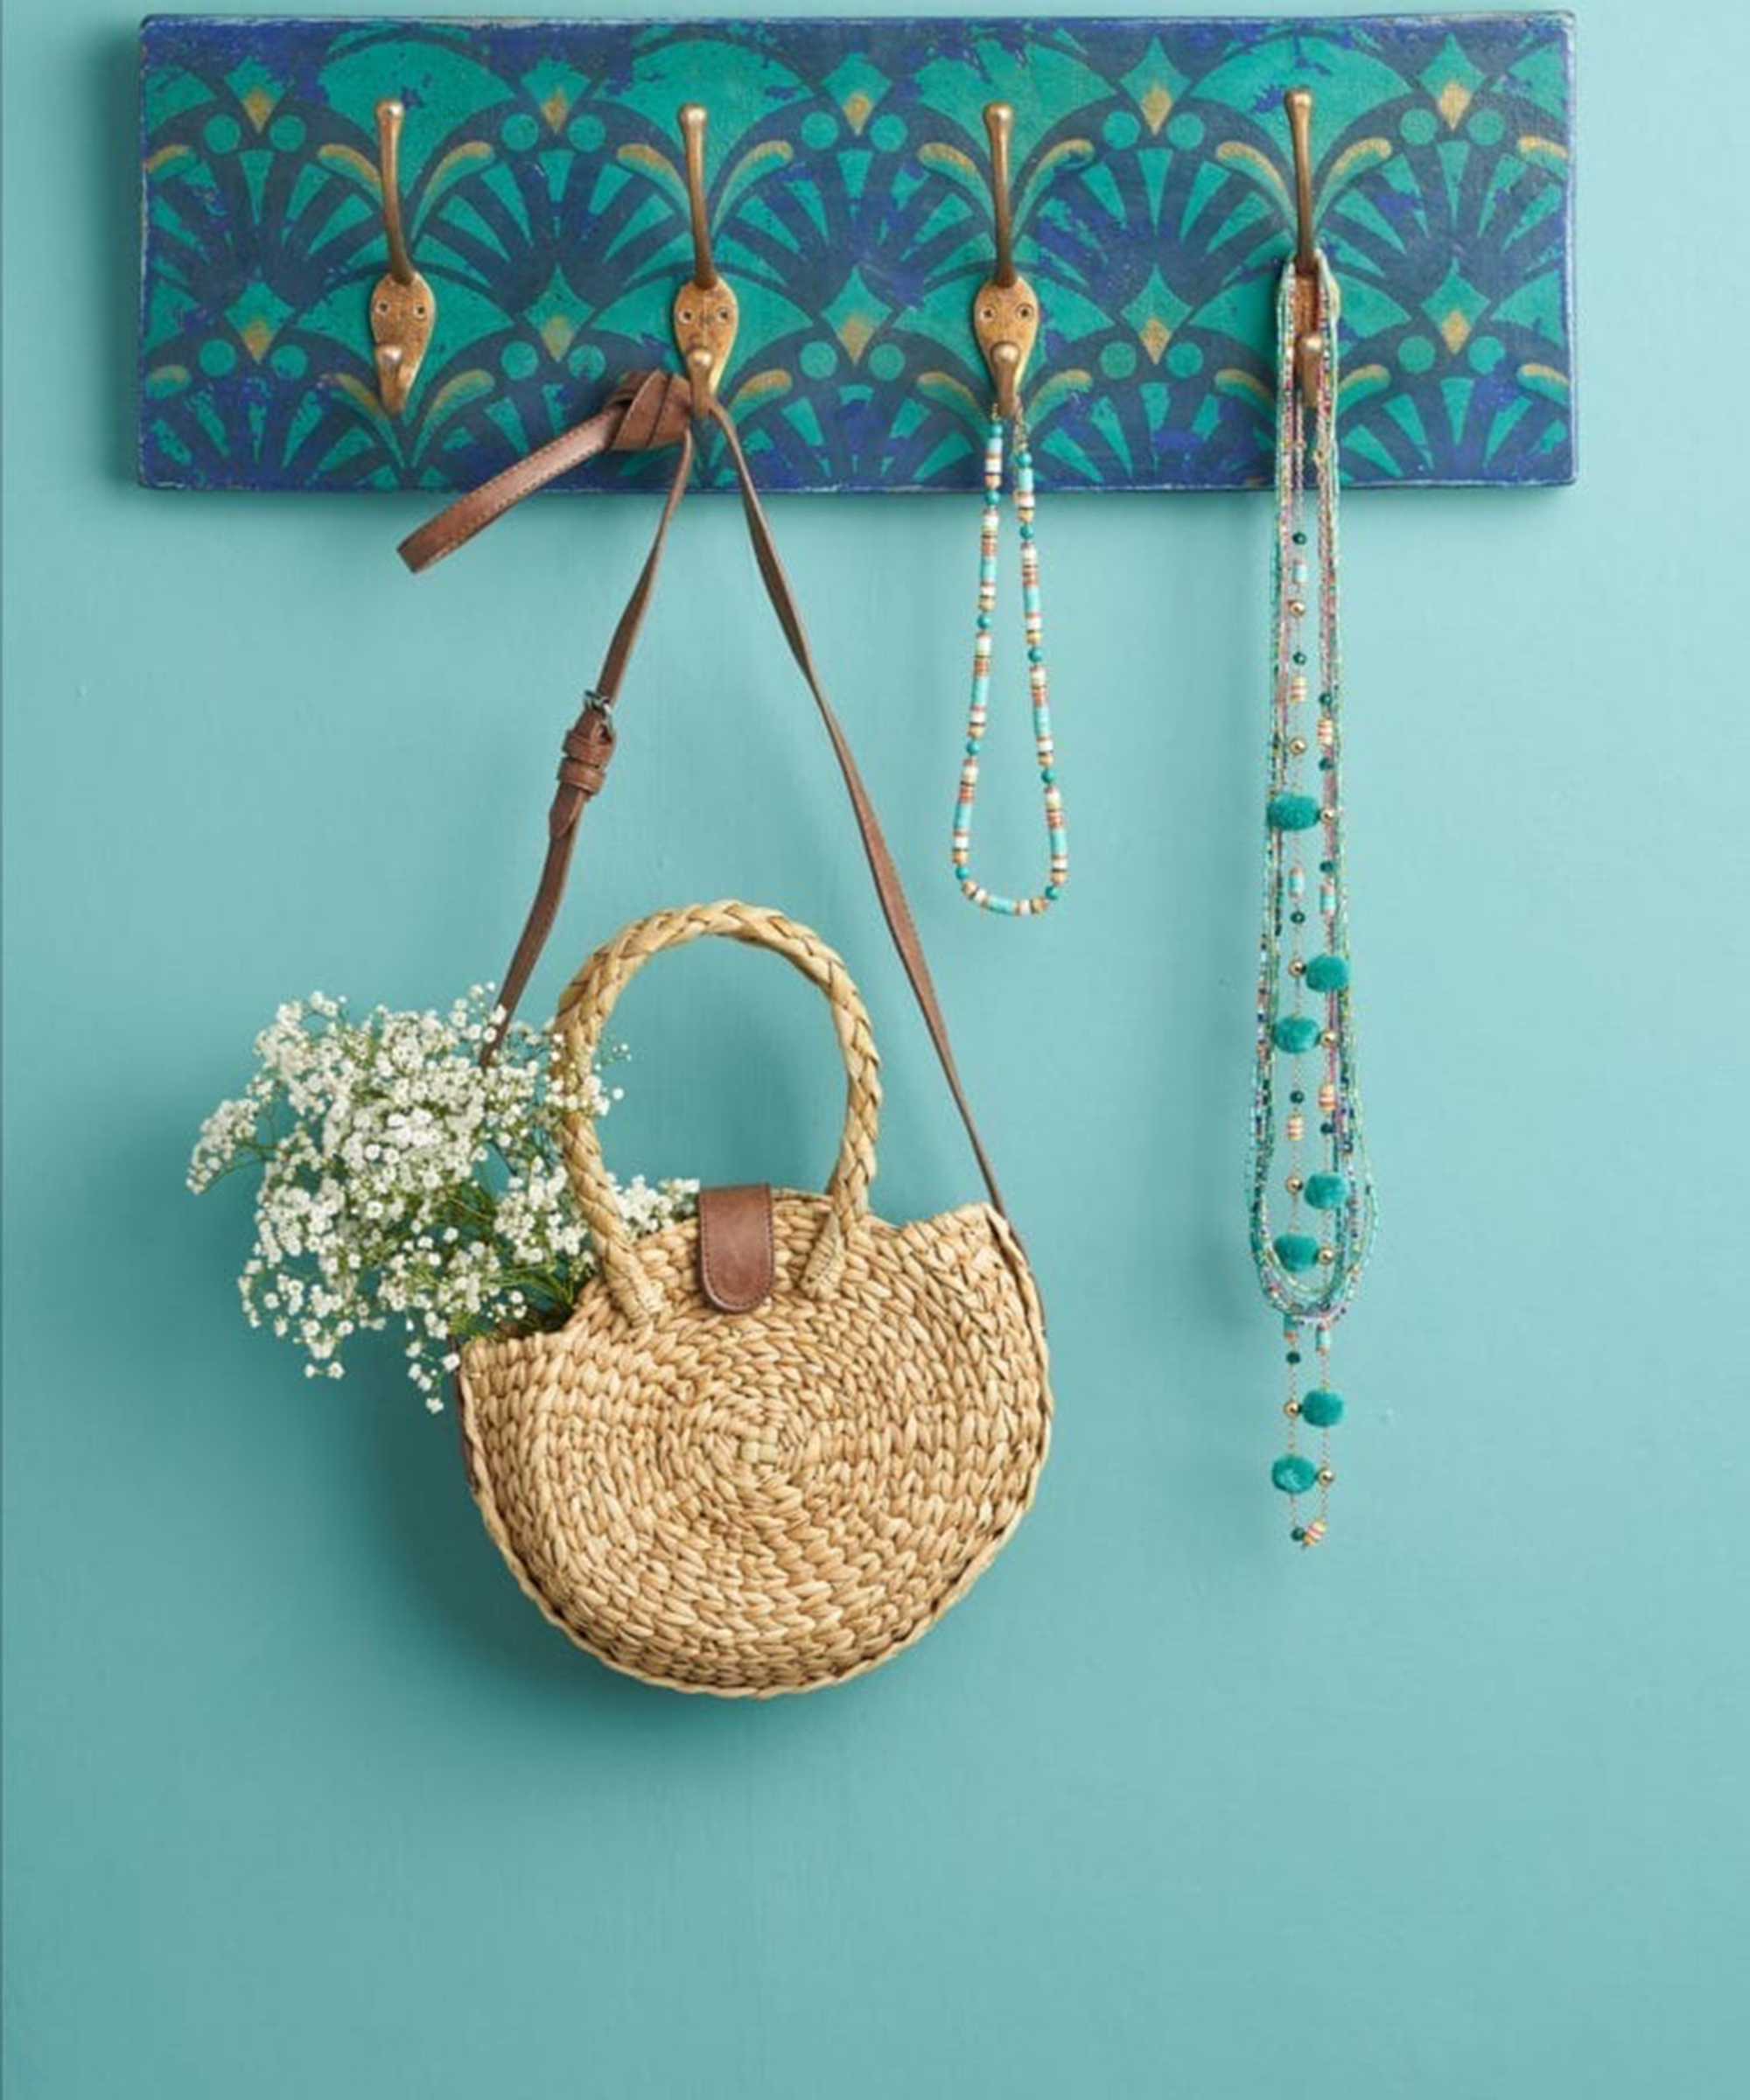
If you've run out of wardrobe space and don't quite need a clothes rack for your coats and jackets, use your wall space effectively with a set of coat hooks. These delicately-designed storage spokes will help you find your overgarments, handbags, and accessories quickly and easily.
Jeanie Simpson, former painter in residence and furniture painting expert at Annie Sloan used aqueous colors from the Chalk Paint® palette and Warm Gold Gilding wax to achieve a rustic-luxe aesthetic.
You will need:
- The free stencil from The Colourist Issue 3 or any other stencil of your choice
- 120ml Annie Sloan Chalk Paint® in Provence
- 120ml Annie Sloan Chalk Paint® in Napoleonic Blue
- 120ml Annie Sloan Chalk Paint® in Aubusson Blue
- 120ml Annie Sloan Chalk Paint® in Florence
- Annie Sloan Gilding Wax in Warm Gold
- 120ml Annie Sloan Clear Chalk Paint® Wax
- 120ml Annie Sloan Dark Chalk Paint® Wax
- Annie Sloan Chalk Paint® Brushes
- Annie Sloan stencil brush
- Paint scraper
- Board measuring approx 10mm x 600mm
- Coat hooks and screws - choose your faves from Amazon
- Fixtures for applying to a wall
How to:
- Jeanie first painted the board in her base color, Chalk Paint® in Provence.
- Once dry, she applied a thicker coast of Napoleonic Blue over the top and a final coat of Aubusson Blue.
- Using the free stencil, a stencil brush and a moderate amount of Florence, she applied the Art Deco design methodically across the board.
- Once all dry, Jeanie distressed the board with a paint scraper, removing layers of paint to reveal the Provence and Napoleonic Blue underneath.
- Then, using the stencil as a guide, she added Warm Gold Gilding Wax to highlight the pattern and adding some Gatsby-esque glamour.
- Finally, she used Dark Chalk Paint® Wax to age further and then Clear Chalk Paint® Wax to protect.
This particular DIY bedroom decor would look great in a teal bedroom, but feel free to switch up the shades so that it works for your space.
5. Rust-Oleum's DIY trash can nightstand
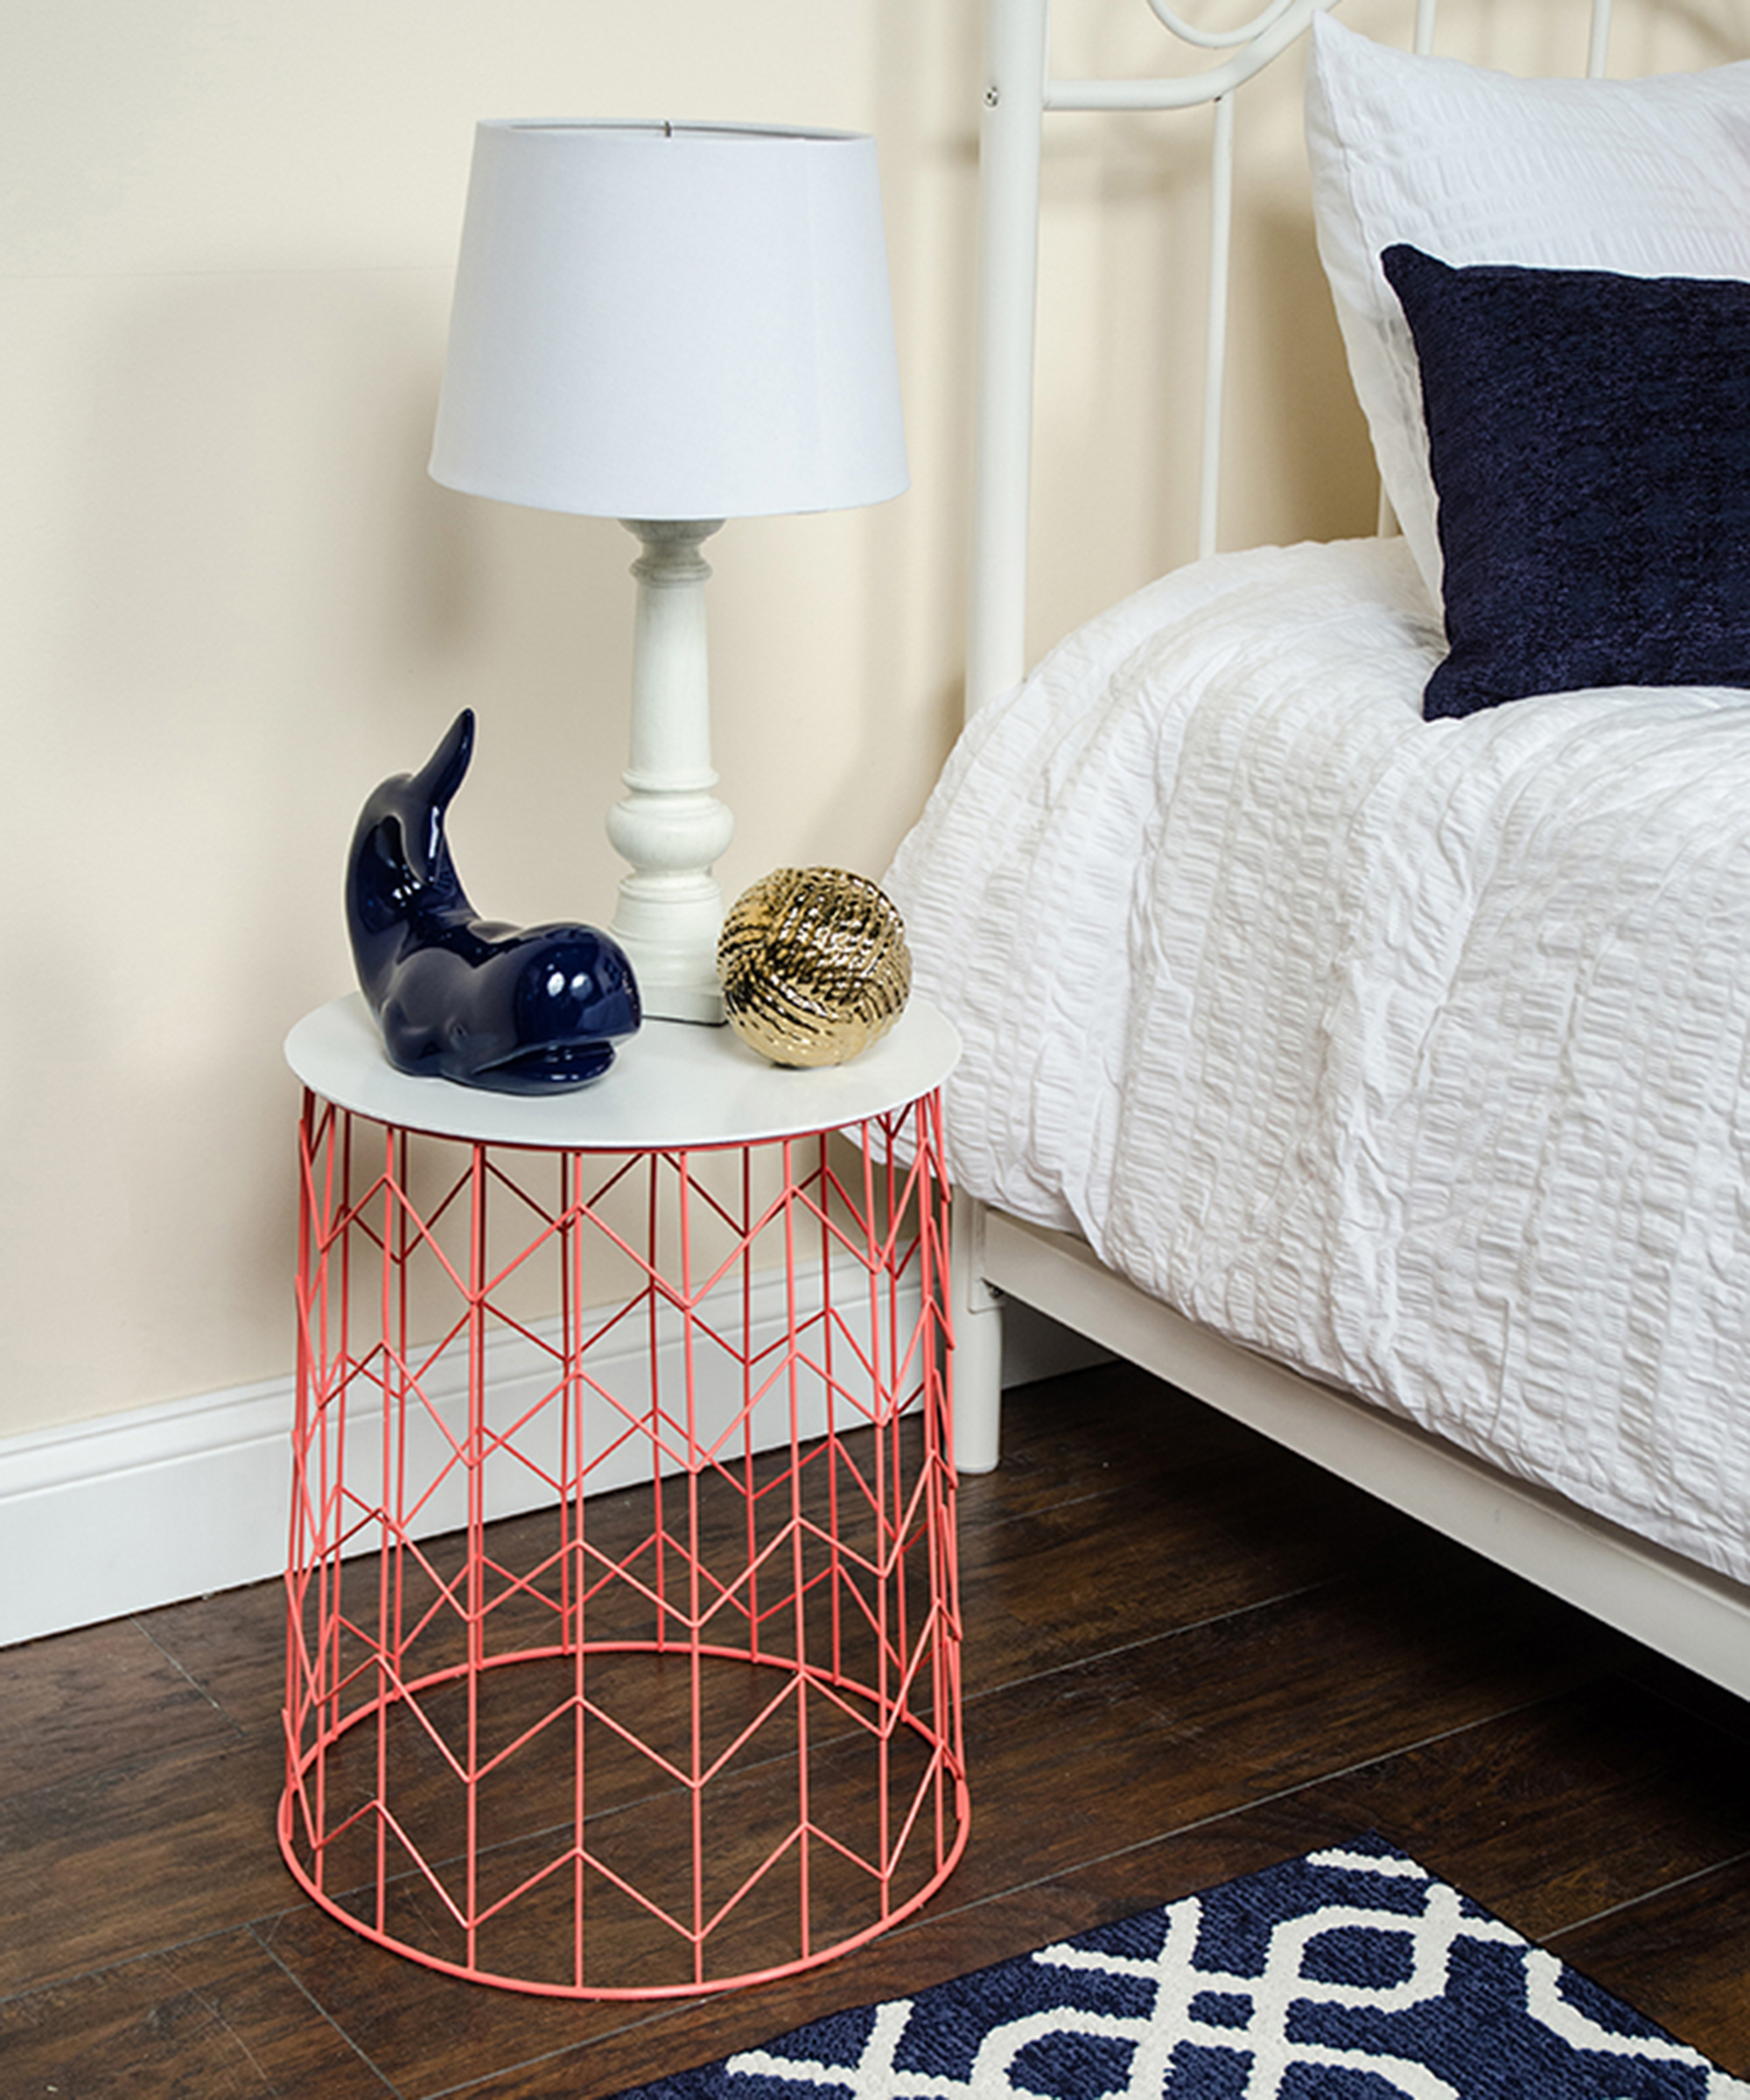
A DIY nightstand like this one is not only stylish and 100% customizable, but also extremely cheap to make, making it the perfect kid's room idea. Not to mention the fact that you get to brag about your excellent upcycling skills. All it takes is a wire waste bin and a little bit of your time.
You will need:
- 2 x Rust-Oleum ultra cover gloss spray - pop a can in your Amazon basket
- Drop cloth
- Gloves
- Adhesive glue
- Round wire trash can - something like this would work
- Round wooden tray or round cutting board
How to:
- Prepare your surfaces: Always work in a well-ventilated area and cover nearby items with drop cloths to protect them from overspray.
- Spray paint your trash can: Shake your can of Ultra Cover 2X Gloss spray paint (we used Gloss Coral) for 1 minute after the mixing ball begins to rattle. Hold the can 10-16” from the trash can and spray in a steady back-and-forth motion, slightly overlapping each stroke. Apply 1-2 light coats a few minutes apart.
- Spray paint your round tray top: Repeat the same steps on your tray using Ultra Cover 2X Gloss spray paint in Gloss White.
- Stick the components together: Let the trash can and round tray top dry for approximately 1-2 hours. Adhere the tray to the bottom of the wire trash can using strong adhesive glue. Allow 24 hours for the entire nightstand to dry before using.
- Style: Once your nightstand is completely dry, add a complementary bedside lamp and place it next to your bed. Don't forget a matching table on the other side.
6. Palm peel-and-stick wallpaper bedside table
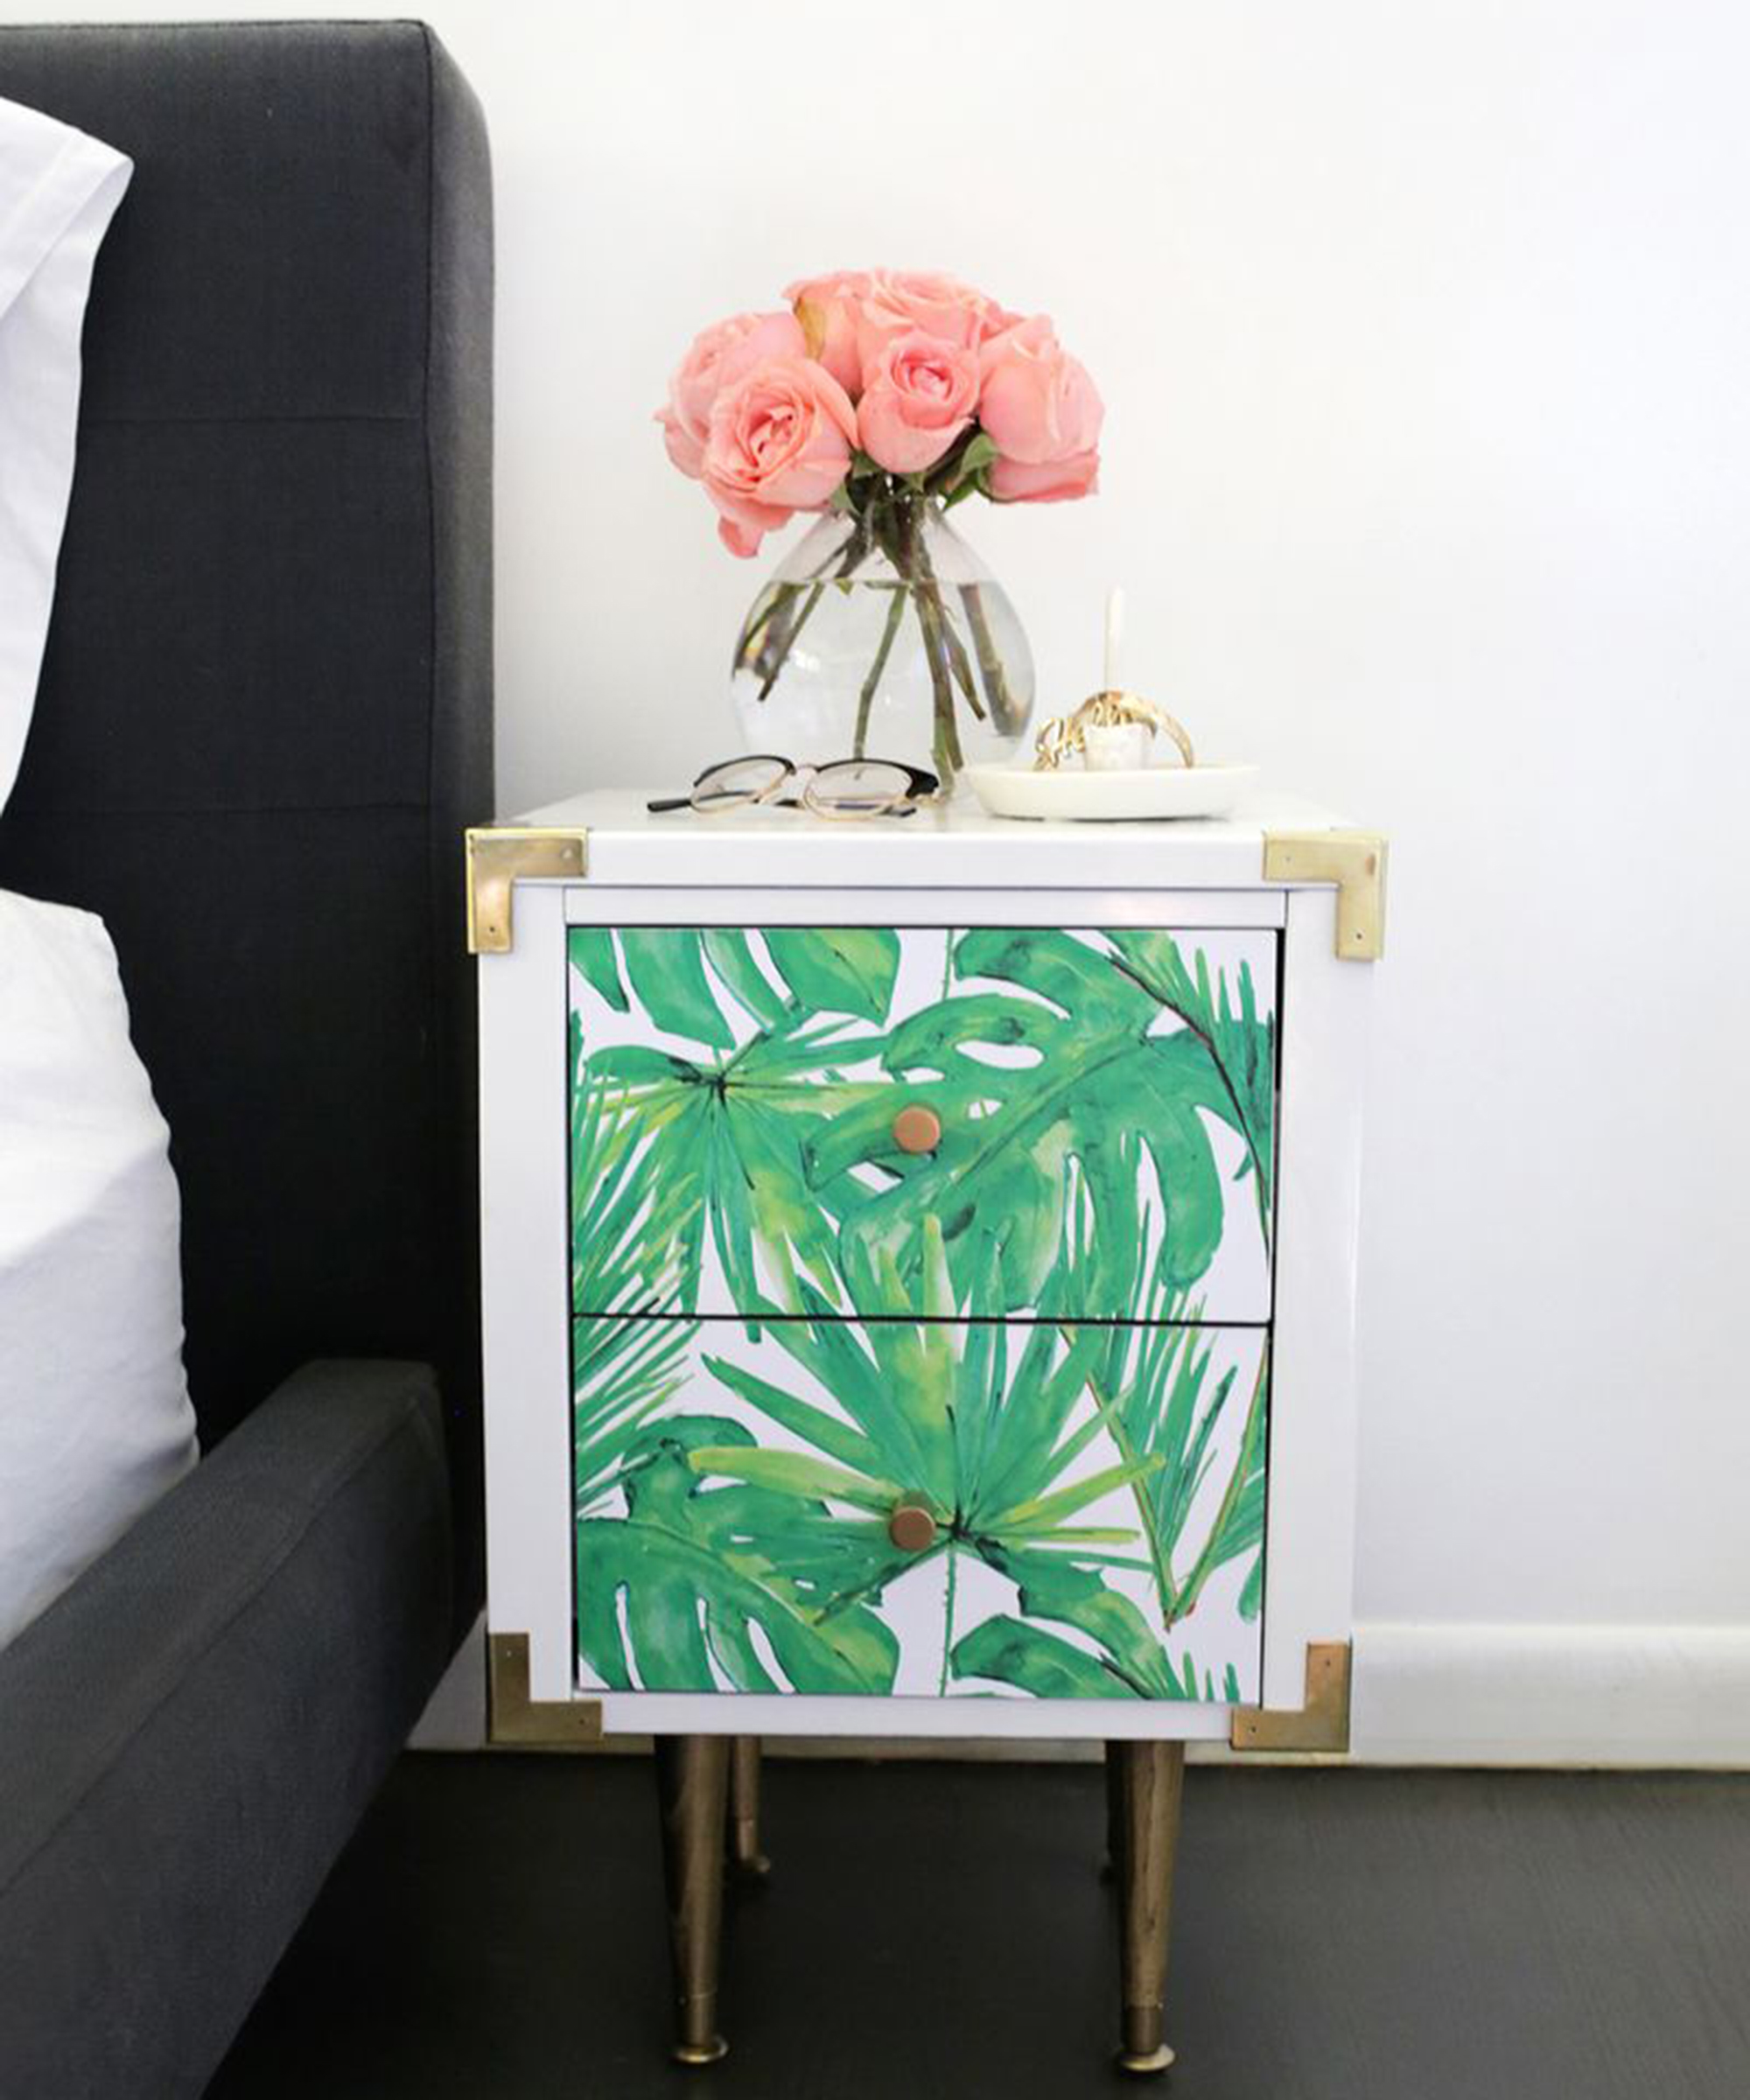
Using the best peel-and-stick wallpaper to resurface a bedside table is a quick, easy, and cost-effective way to add personality to a space without adding an entire accent wall.
Often only requiring a panel or two for a bedside table resurfacing, this easily-removable wallpaper from Chasing Paper is available in a variety of prints and retails from $45 per 2’ x 4’ panel which makes it a rental-friendly choice.
You will need:
- A bedside table
- Peel-and-stick wallpaper - Amazon has tonnes of choices.
- Xacto blade - this 100pc set on Amazon is a cut above the rest.
- Pencil
- Measuring tape
- Ruler or straight edge
- Wallpaper smoother
- Washcloth and gentle surface cleaner
- Nail scissors, etc. (something sharp to poke a hole)
How to:
- Remove any knobs and/or hardware on the surface of the nightstand.
- Using your washcloth and gentle surface cleaner, clean the surface and allow to dry completely before installation (any dust, dirt or moisture left on the surface may affect the wallpaper’s ability to adhere properly).
- Using your measuring tape, measure the height and width of each surface that you would like to cover, whether it is a drawer or the top of the bedside table. Use these measurements and your Xacto blade to cut out the correct size, incorporating something such as a ruler or a straight edge to ensure the cut is straight.
- After the pieces have been cut, start at one corner of the surface you are applying to. Peel the wallpaper from the backing for only a few inches and smooth onto the surface with your smoother or your hand. As you move along, unpeel more backing and continue smoothing until the entire piece adheres to the surface.
- If any stubborn air bubbles remain after smoothing a few times, use a pin to create a tiny hole and smooth out the bubble.
- After the wallpaper has adhered, it is time to add the knobs and/or hardware back on. Use something pointy, such as a nail or scissors, to gently poke a hole in the wallpaper where the knob and/or hardware needs to go.
- If any wallpaper needs to be trimmed, use the Xacto blade to carefully trim away any excess.
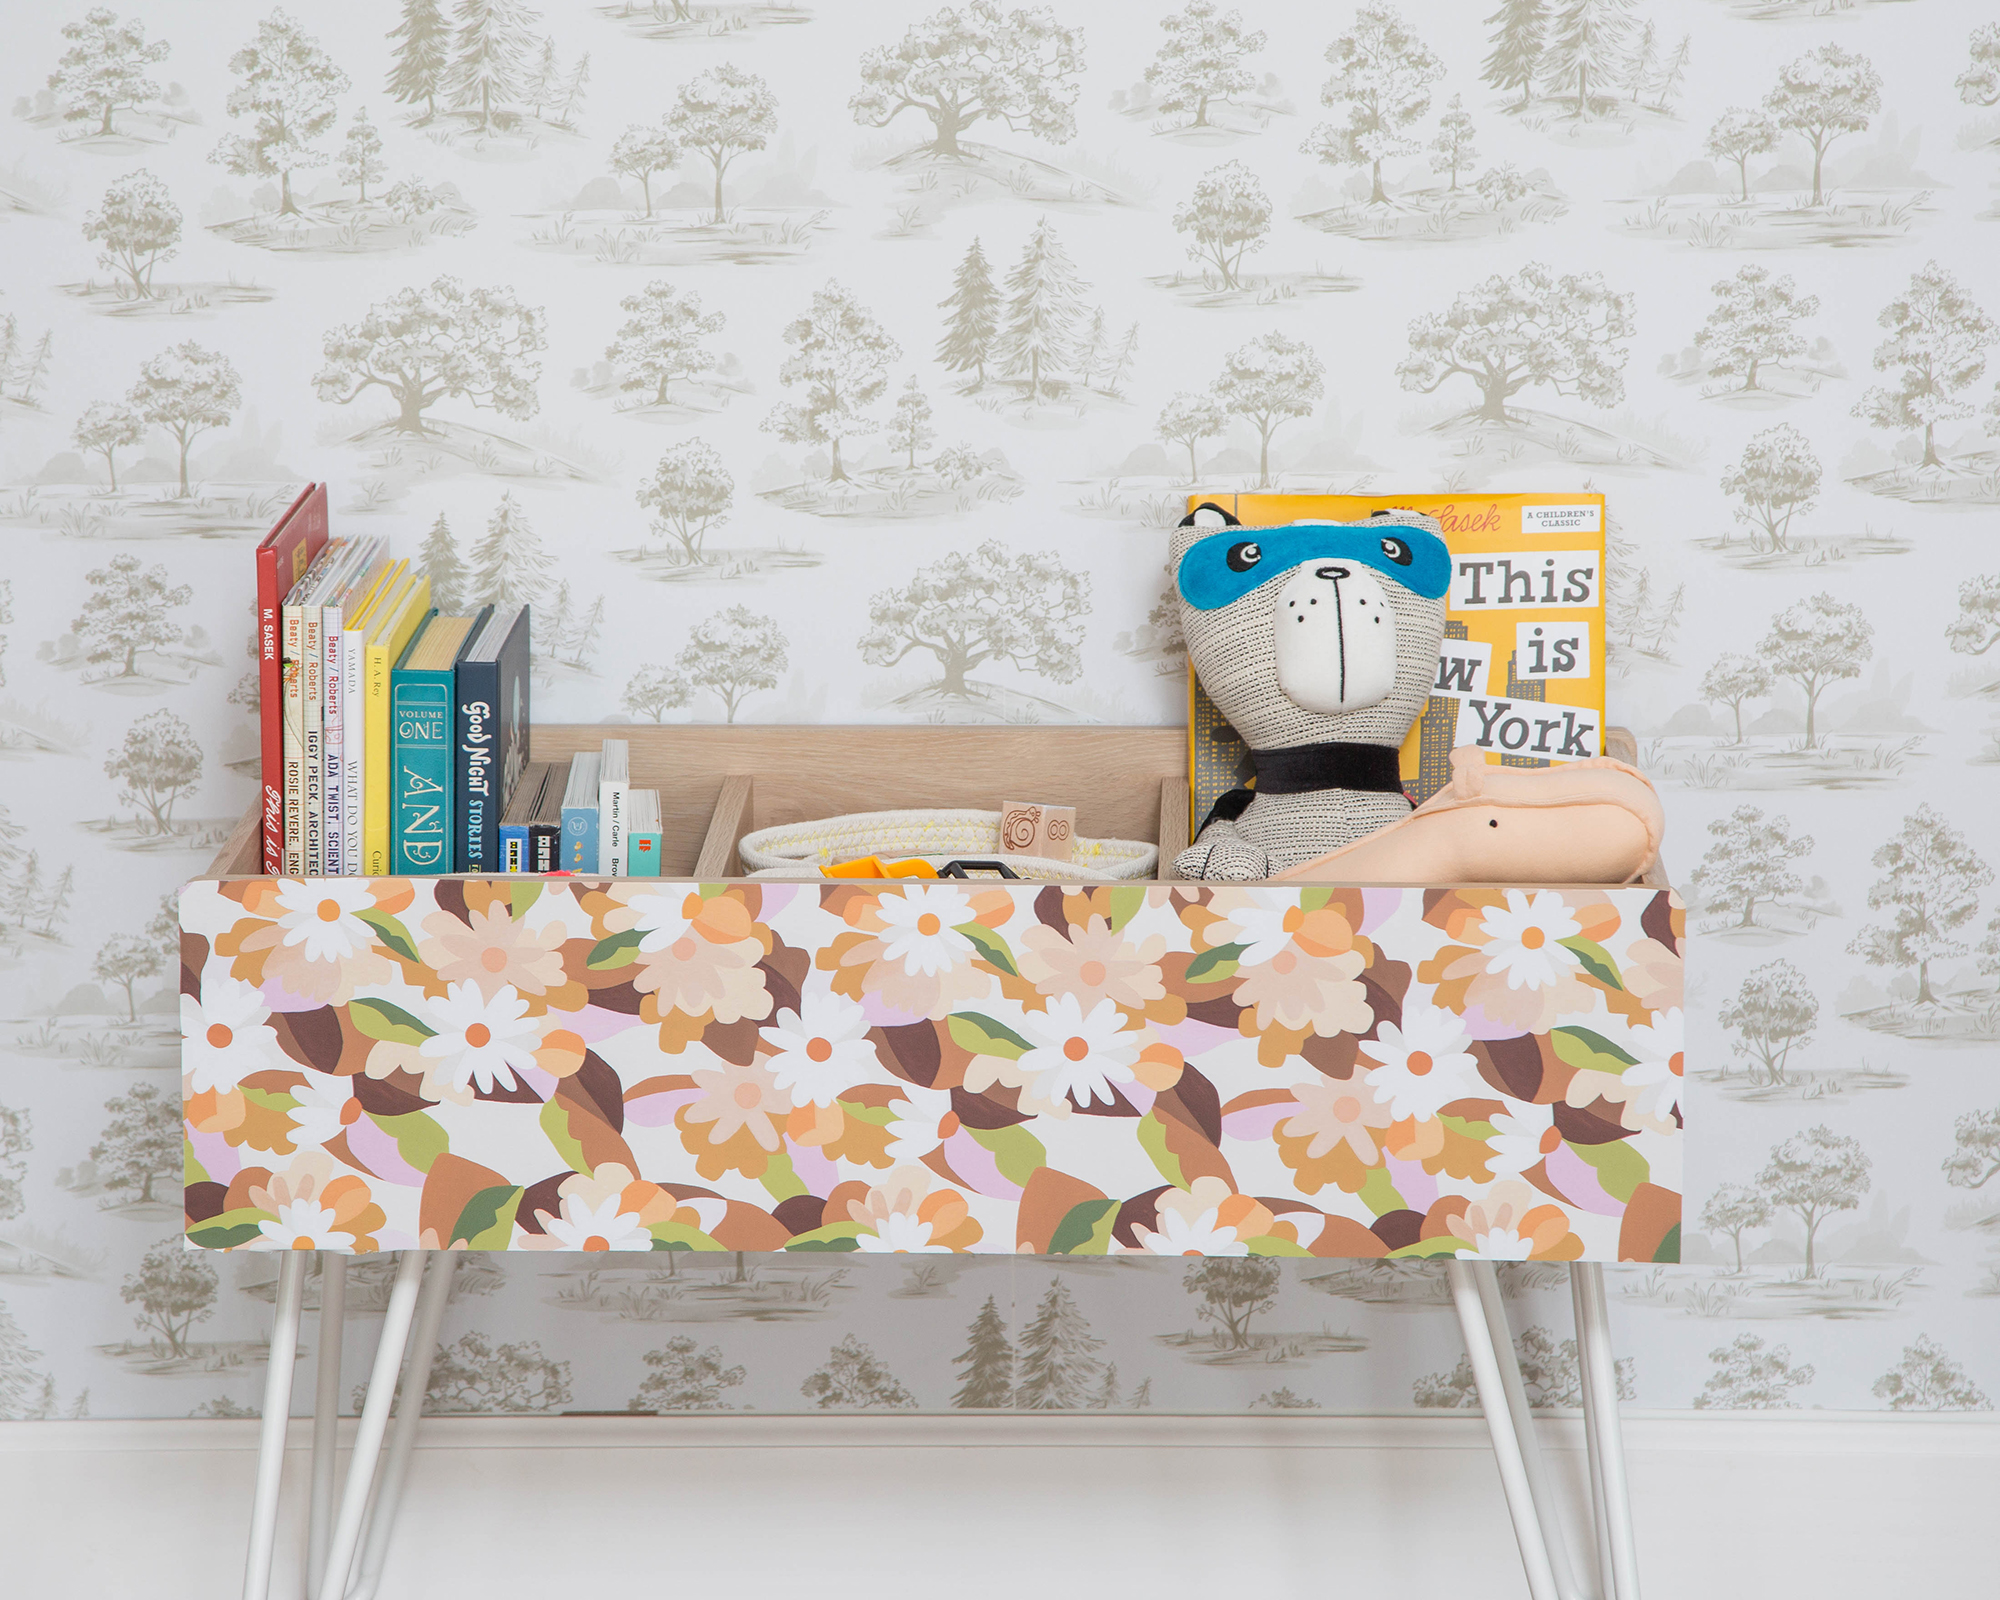
This toy storage / DIY bookshelves have also had a similar treatment using the same guide.
7. Homebase's DIY rattan webbing wardrobe
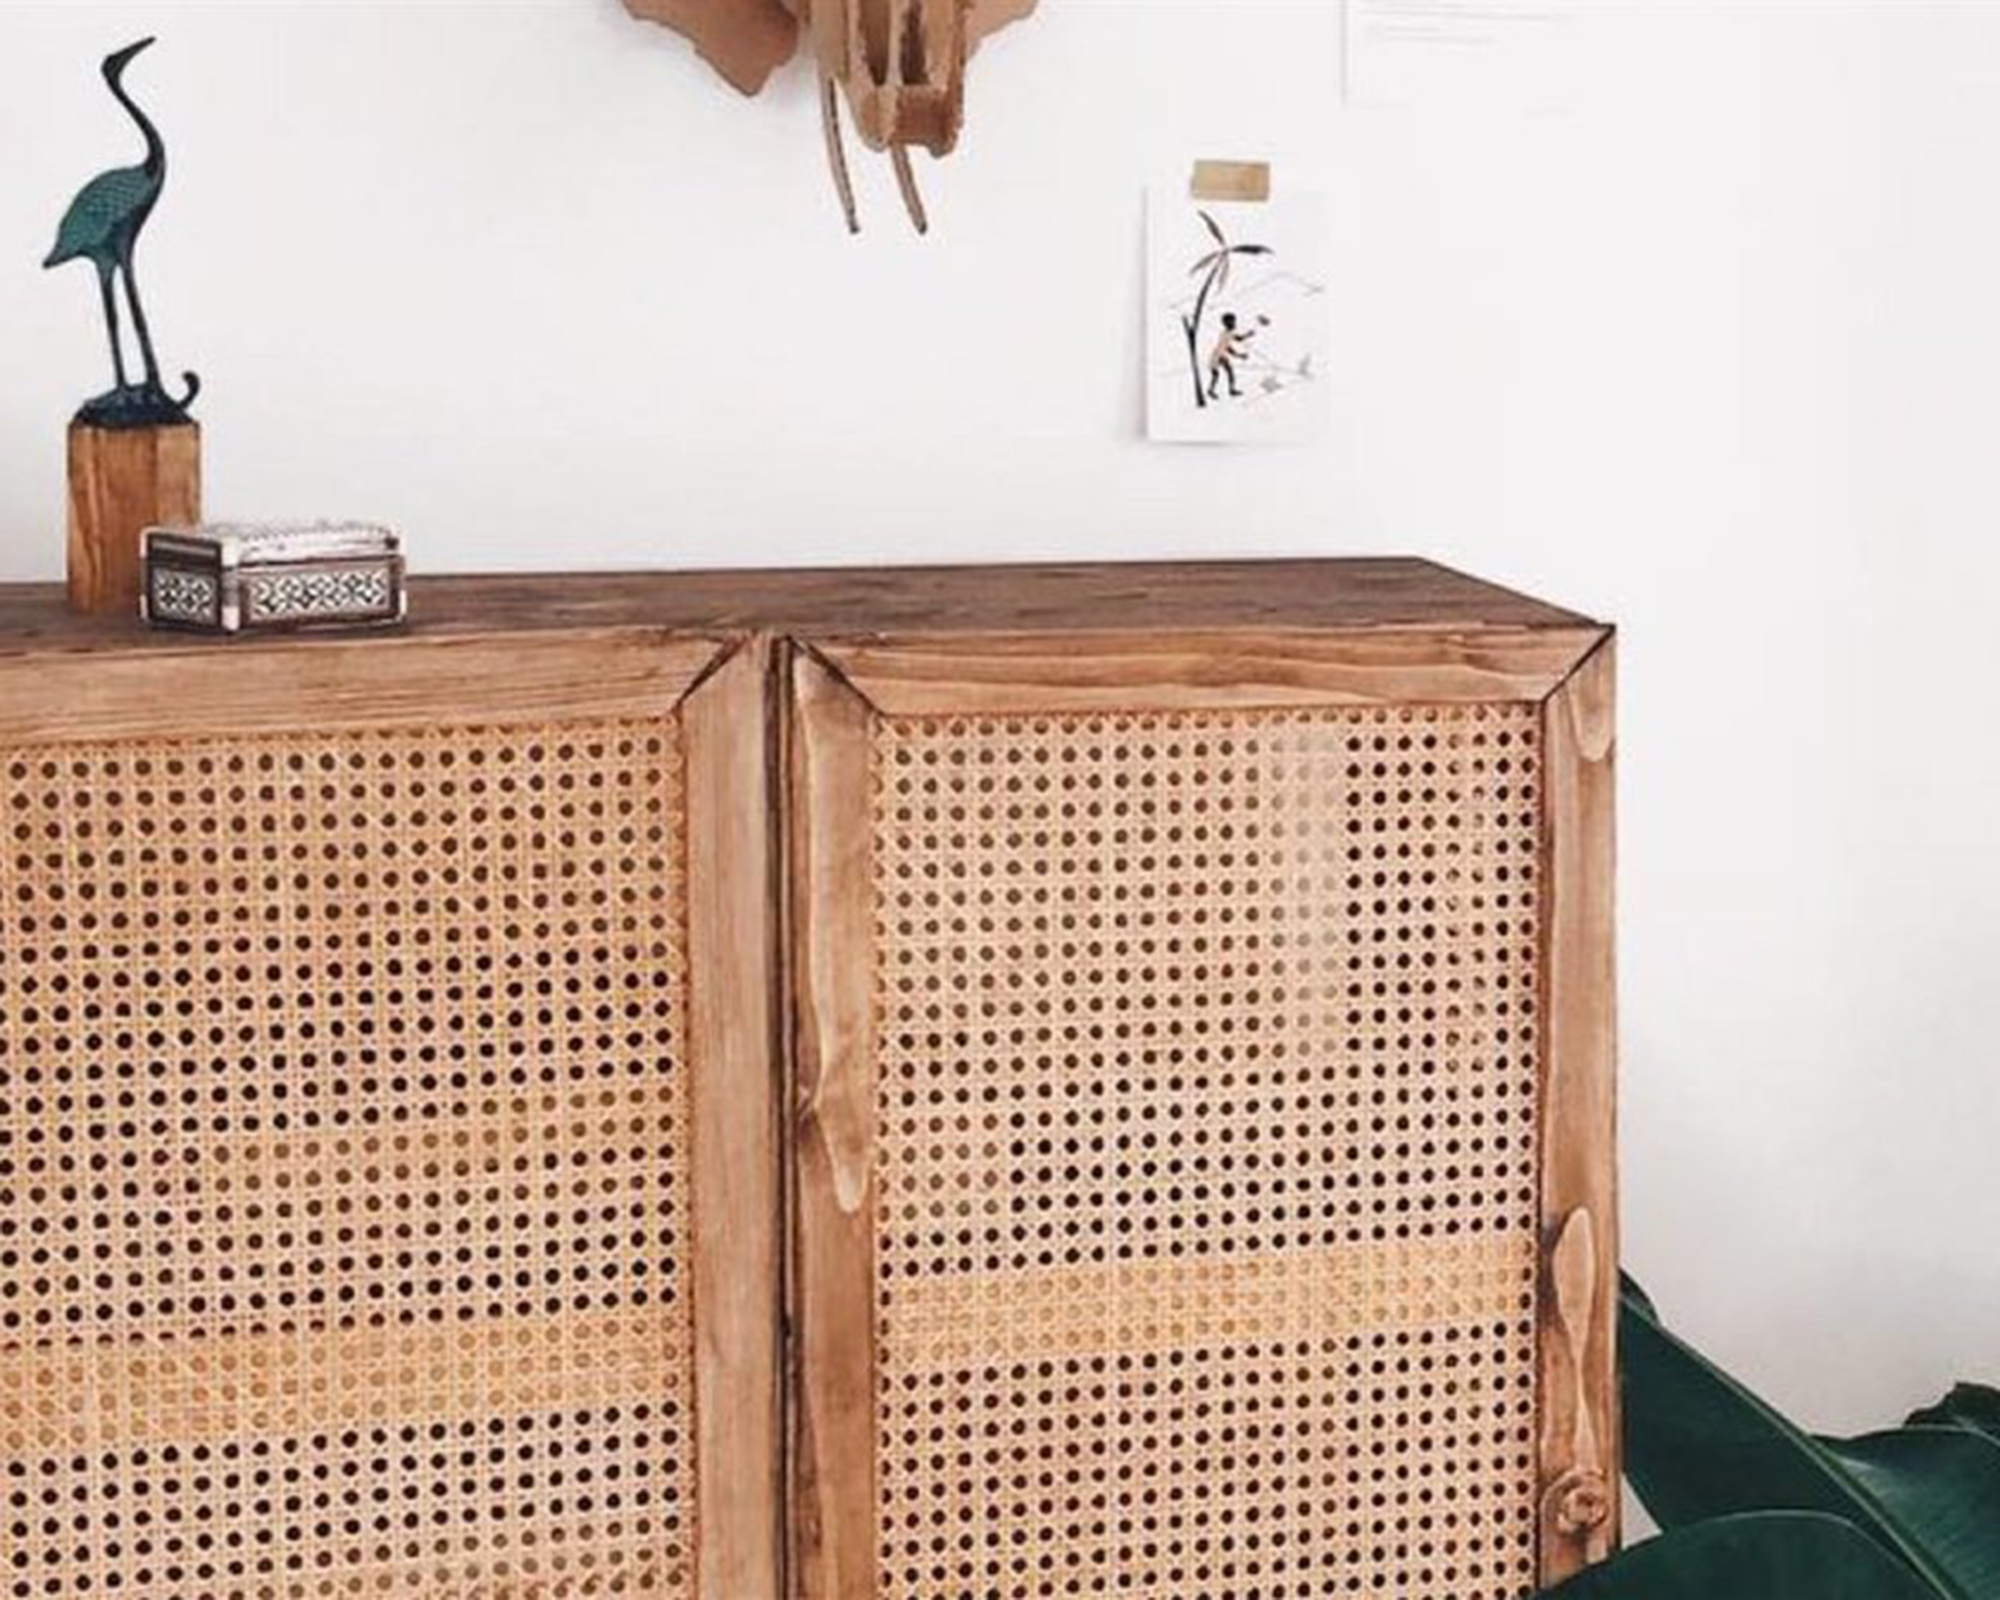
Not just for retro seventies-inspired homes, rattan is having a moment. And not just in the garden, but in the bedroom too. Here, home improvement retail store, Homebase show us how to create a home for our tees, dresses, and blouses with this clothes storage unit.
You will need:
- Black & Decker jigsaw - cheaper than you think at Amazon
- Black & Decker power drill - have it tomorrow with Amazon Prime
- Black & Decker sander - this'll deliver smooth results
- Staple gun/nail gun
- Hammer
- Nails
- Long screws
- Roll of rattan webbing - roll up, roll up!
- Sheet of MDF
- Wood stain
- Brush
- Dowels
- Pencil
- Tape measure
- Scissors
How to:
- The perfect place to start is by cutting out your pieces for each part of your wardrobe – namely the wardrobe frame (10 wooden boards at 30.6cm, 4 wooden boards at 80cm x 40cm, 4 wooden beams at 130cm, 1 wooden beam at 70.6cm), doors (4 wooden slats at 97.5cm x 3.5cm, 8 wooden slats at 33cm) and slats (8 wooden slats at 39cm, 8 wooden slats at 79cm).
- With your wood cut and ready, it’s time to start putting the carcass of your wardrobe together. It’s up to you whether you want to use screws with a power drill or just dowels – but dowels are the best choice if you plan on dismantling or moving your wardrobe later down the line. Grab two of your longest frame beams (the 130cm ones), then measure, mark, and drill a hole every 32.5cm along them to about half the depth of your dowels.
- With your dowels placed in both beams, color in the top of them with a pencil and press them against your short (30.6cm) boards to leave a mark, ready to be pre-drilled. You should have 5 holes to match up against 5 dowels on each side once you’re finished, as well as your bottom beam too – so power drill them all.
- Before you start assembling, you need to cut the shelves to fit inside your wardrobe. Take 3 of your 4 boards and mark a square corner cut of 5cm on each corner, then cut them off with your jigsaw, sand down, and put them aside.
- With your dowels placed in both beams, color in the top of them with a pencil and press them against your short (30.6cm) boards to leave a mark, ready to be pre-drilled. You should have 5 holes to match up against 5 dowels on each side once you’re finished, as well as your bottom beam too – so power drill them all.
- Once your staining has fully dried, it’s time to start building the wardrobe. Pick up one of your large beams, put the dowels in your pre-drilled holes and slide your shortboards onto the other end from top to bottom. Now, you can do the same with your large beam on the other side – which should leave you with a ladder shape. Repeat the whole process with your other beams and boards until you have two of the same shape – then attach your bottom beam with a power drill for added strength.
- Despite the bottom beam, the whole thing is probably still a little wobbly, so prop it up against a wall and we can get the shelves in for extra sturdiness. Starting from the bottom, line up your corner cut-outs and place each shelf on their sideboards, keeping them symmetrical all the way up to the top – where your un-cut board will sit. Once they’re all placed, use long screws to fix them in place at the corners. TOP TIP: Want to make sure your wardrobe is rock solid? Now’s your chance to fix the beams and boards together with construction plates too.
- Let’s take a step back – what is your wardrobe still missing? The doors and rattan webbing, of course! Much like the wardrobe sides, each of your doors are constructed by taking two of your long wooden slats (97.5cm) and spacing them out with four of your shorter (33cm) slats down the middle ladder style – either gluing or nailing them in place and repeating for the other door.
- Next up, your rattan webbing. For the easiest way to cover your wardrobe doors, lie the frame flat on the floor and unroll your rattan over the top. Using a nail gun or staple gun, fix the webbing in place to the door, then trim with scissors on all sides until it’s neat. Now just repeat the step for your other door. TOP TIP: Your rattan webbing should be fairly pliable – but soak it in lukewarm water for about 45 minutes to soften it up first if it’s not.
- Before you put the doors on, you’ll want to attach your rattan to the rest of your wardrobe too. Starting at the bottom, roll your rattan up the side and rest it on top. Then fully staple it down and trim as before – repeating on the opposite side, but not the open back.
- Let’s get those doors on, shall we? You’ll need two hinges on either side, so break out the tape measure and mark up where the holes need to be top and bottom on your wardrobe, and the doors too. Then power drill all of them and screw on your hinges to the doors first. Once they’re in place, get someone to hold your doors level so you can attach your hinges to the frame of the wardrobe.
- Last but not least – we need to close up the back of your wardrobe too. No rattan webbing here, just your thin sheet of MDF cut to fit as a backplate. Just nail in place all the way around and you’re finished! All that’s left to do is stand back and admire your hard work, before filling the wardrobe with books, clothes, or whatever else takes your fancy.
8. Rust-Oleum wood framed mirror
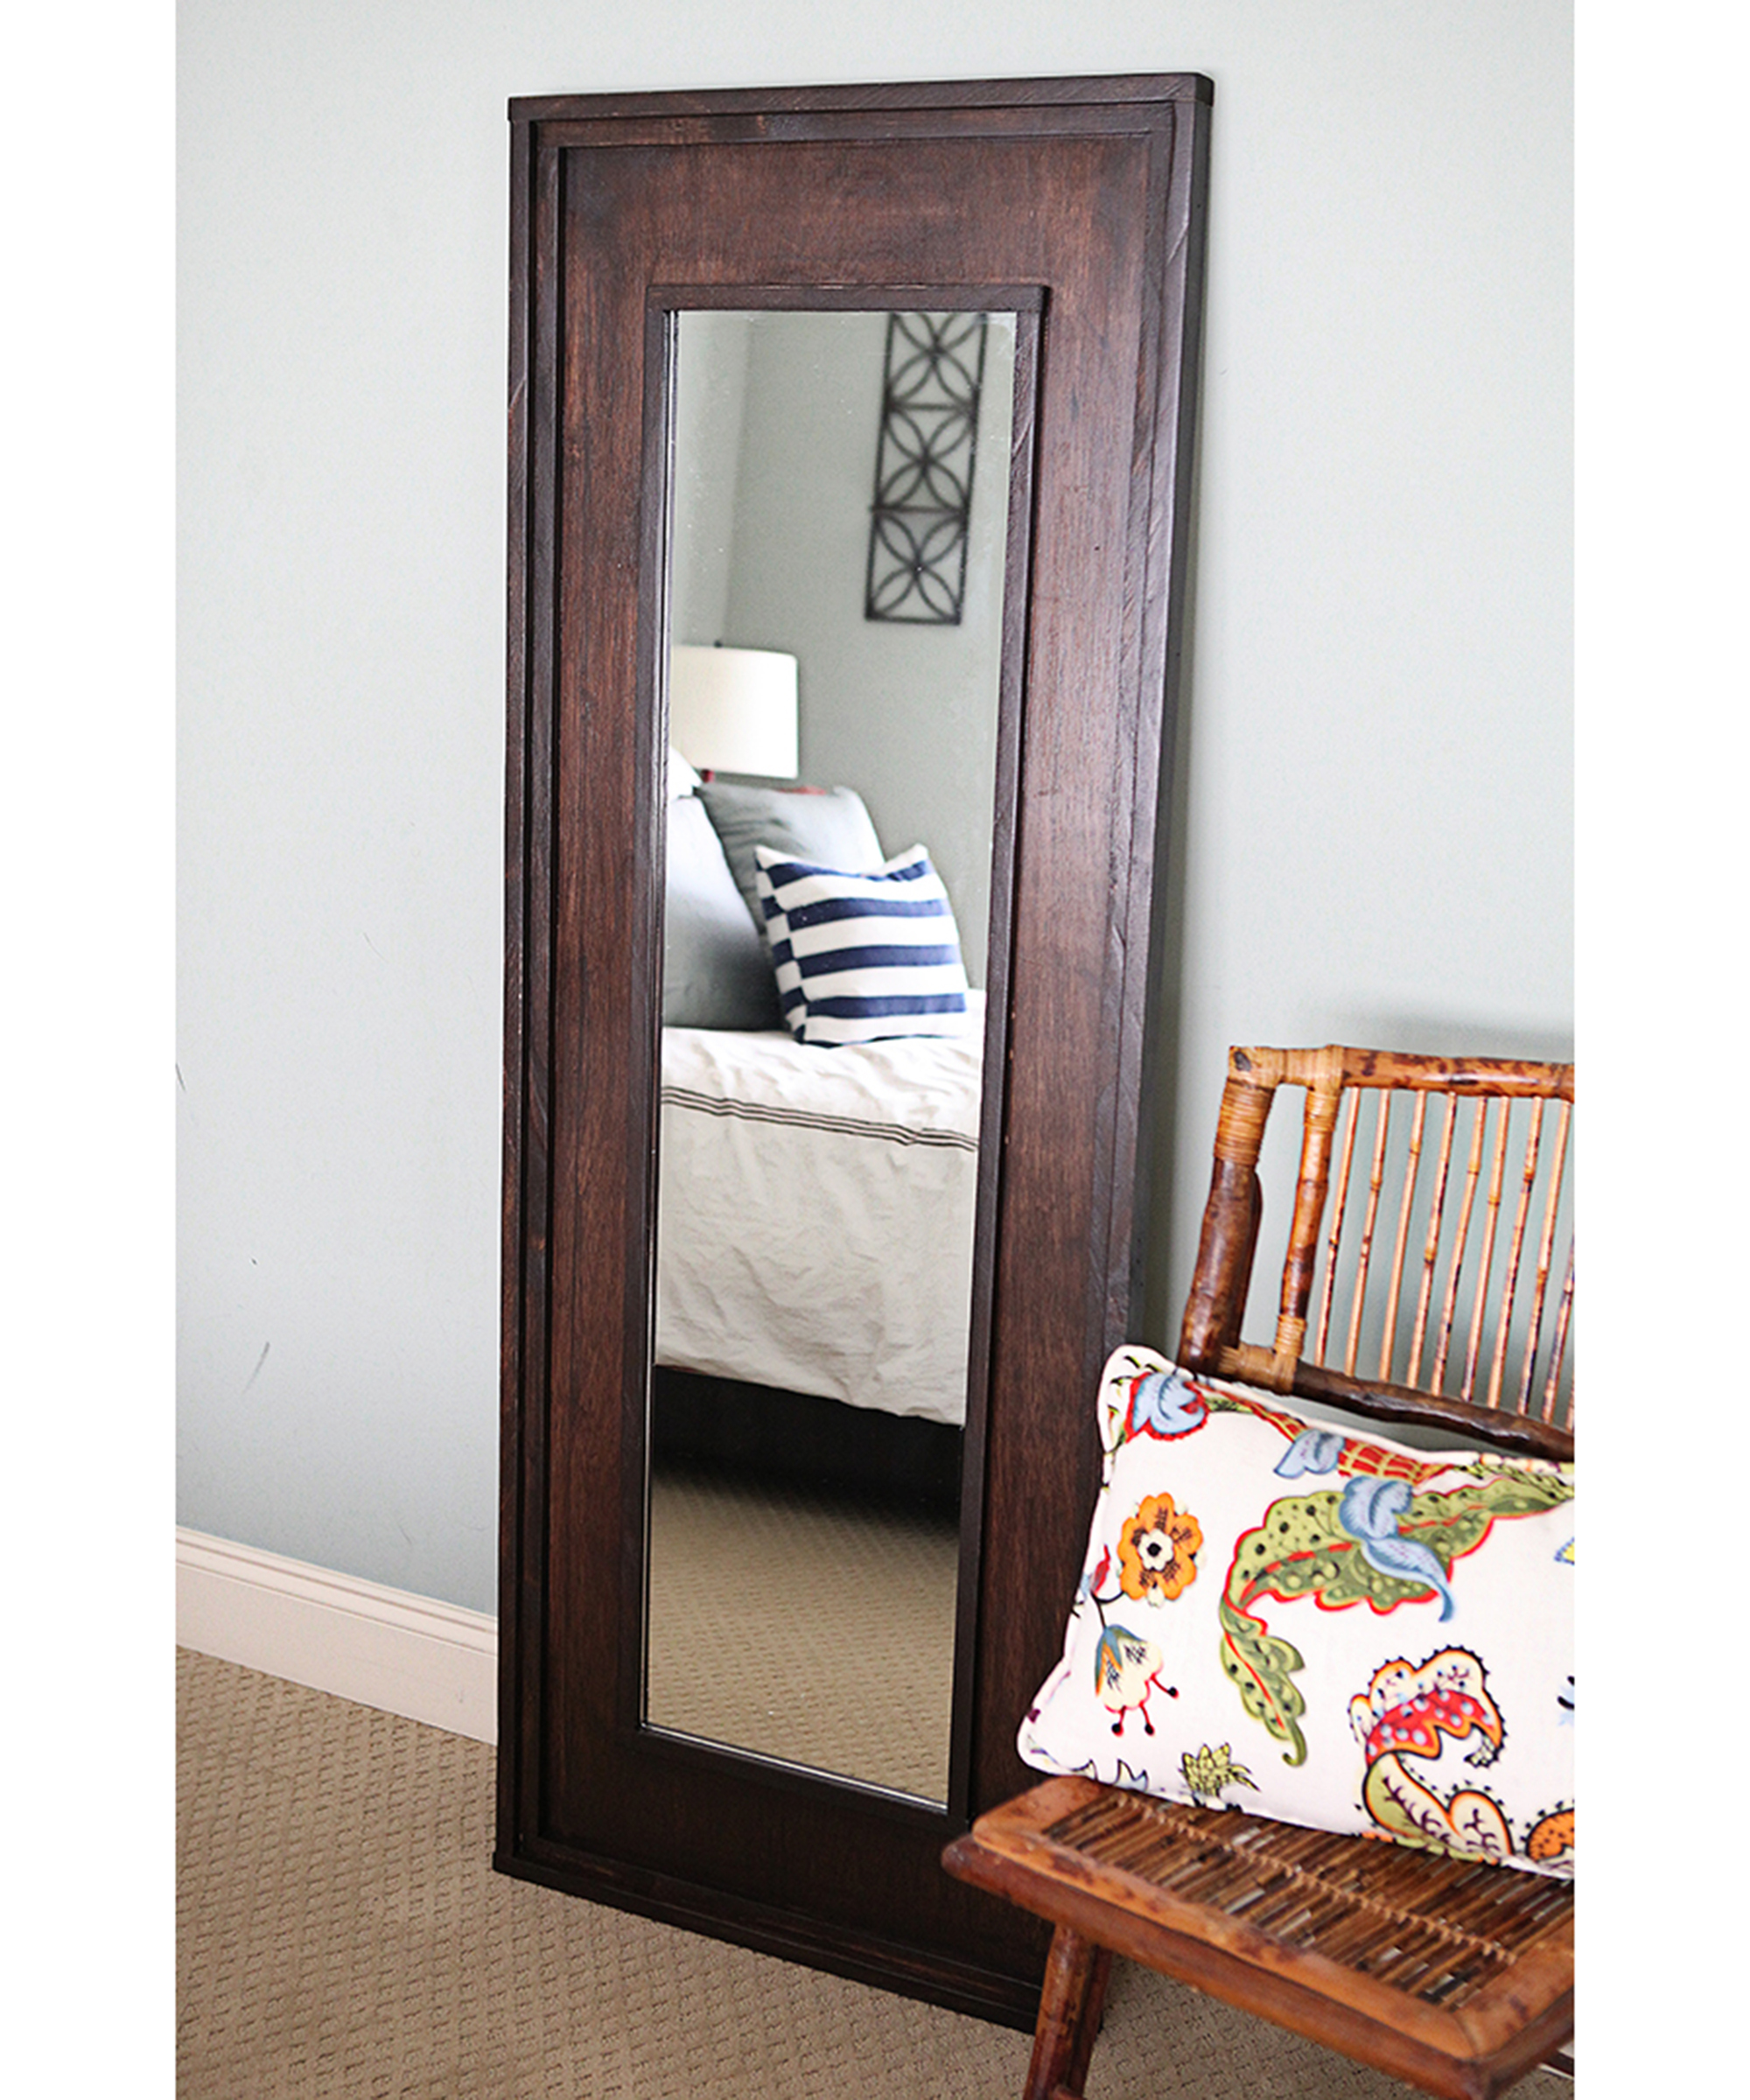
You will need:
- Varathane wood stain in shade Kona - grab it from Amazon
- Varathane polyurethane - available from the Rust-Oleum store at Amazon
- A floor-length mirror (For reference, Rust-Oleum used one that's 12 x 47 3/4”)
- Chisel or drywall knife
- Sandpaper in grits 120, 220, 440
- Lint-free cloth
- x1 59 1/2 x 21 1/2 x 3/4” piece of plywood
- Wood glue
- x1 1/2 x 3/4" pieces of wood: (2) 23”, (2) 59 1/4”
- Brad nailer
- 1/2 x 3/4" pieces of wood: x2 58 1/2”, x2 47 3/4”, x2 13 3/4”, x2 21 1/2”
- Pencil
- Old sheets or drop cloth
- Foam brushes
- Paper towels
- Construction adhesive - this Gorilla Glue branded product is an Amazon fave!
- Polyurethane brush - get one overnight with Amazon Prime
How to:
- Remove the cardboard backing from the door mirror (if applicable).
- Using a chisel or drywall knife, slice the glue around the plastic frame, then carefully remove the mirror, and set it aside. Discard frame and glue.
- Sand all the wood pieces with progressive sandpaper grits. Remove dust with a lint-free cloth.
- To assemble the outer wood frame, set down the plywood, and use glue to attach the 1 1/2" wood trim around the outside edges. Secure with a brad nailer.
- Assemble the inner wood frame by gluing 4 of the 3/4" pieces—(2) 58 1/2" and (2) 47 3/4"—to the plywood around the inside edges of the outer wood frame.
- Center the mirror on the plywood.
- Align the remaining 3/4" wood pieces around the mirror’s edge and trace the outline with a pencil.
- Remove the mirror, then glue the 3/4" wood in place, and allow it to dry.
- Set the frame on the drop cloth and use a foam brush to apply the stain in the direction of the wood grain.
- Remove excess stain with a paper towel, and allow it to dry.
- Apply polyurethane in the direction of the wood grain with the polyurethane brush, and allow it to dry.
- Lightly sand with 440-grit sandpaper, and remove all dust with a lint-free cloth.
- Apply another coat of polyurethane, and allow it to dry.
- With the wood frame lying flat on the drop cloth, apply construction adhesive to the back of the mirror, then set it in place on the frame. Allow it to dry.
- Set the framed mirror against a wall.
9. Homebase's DIY wood slat wall paneling
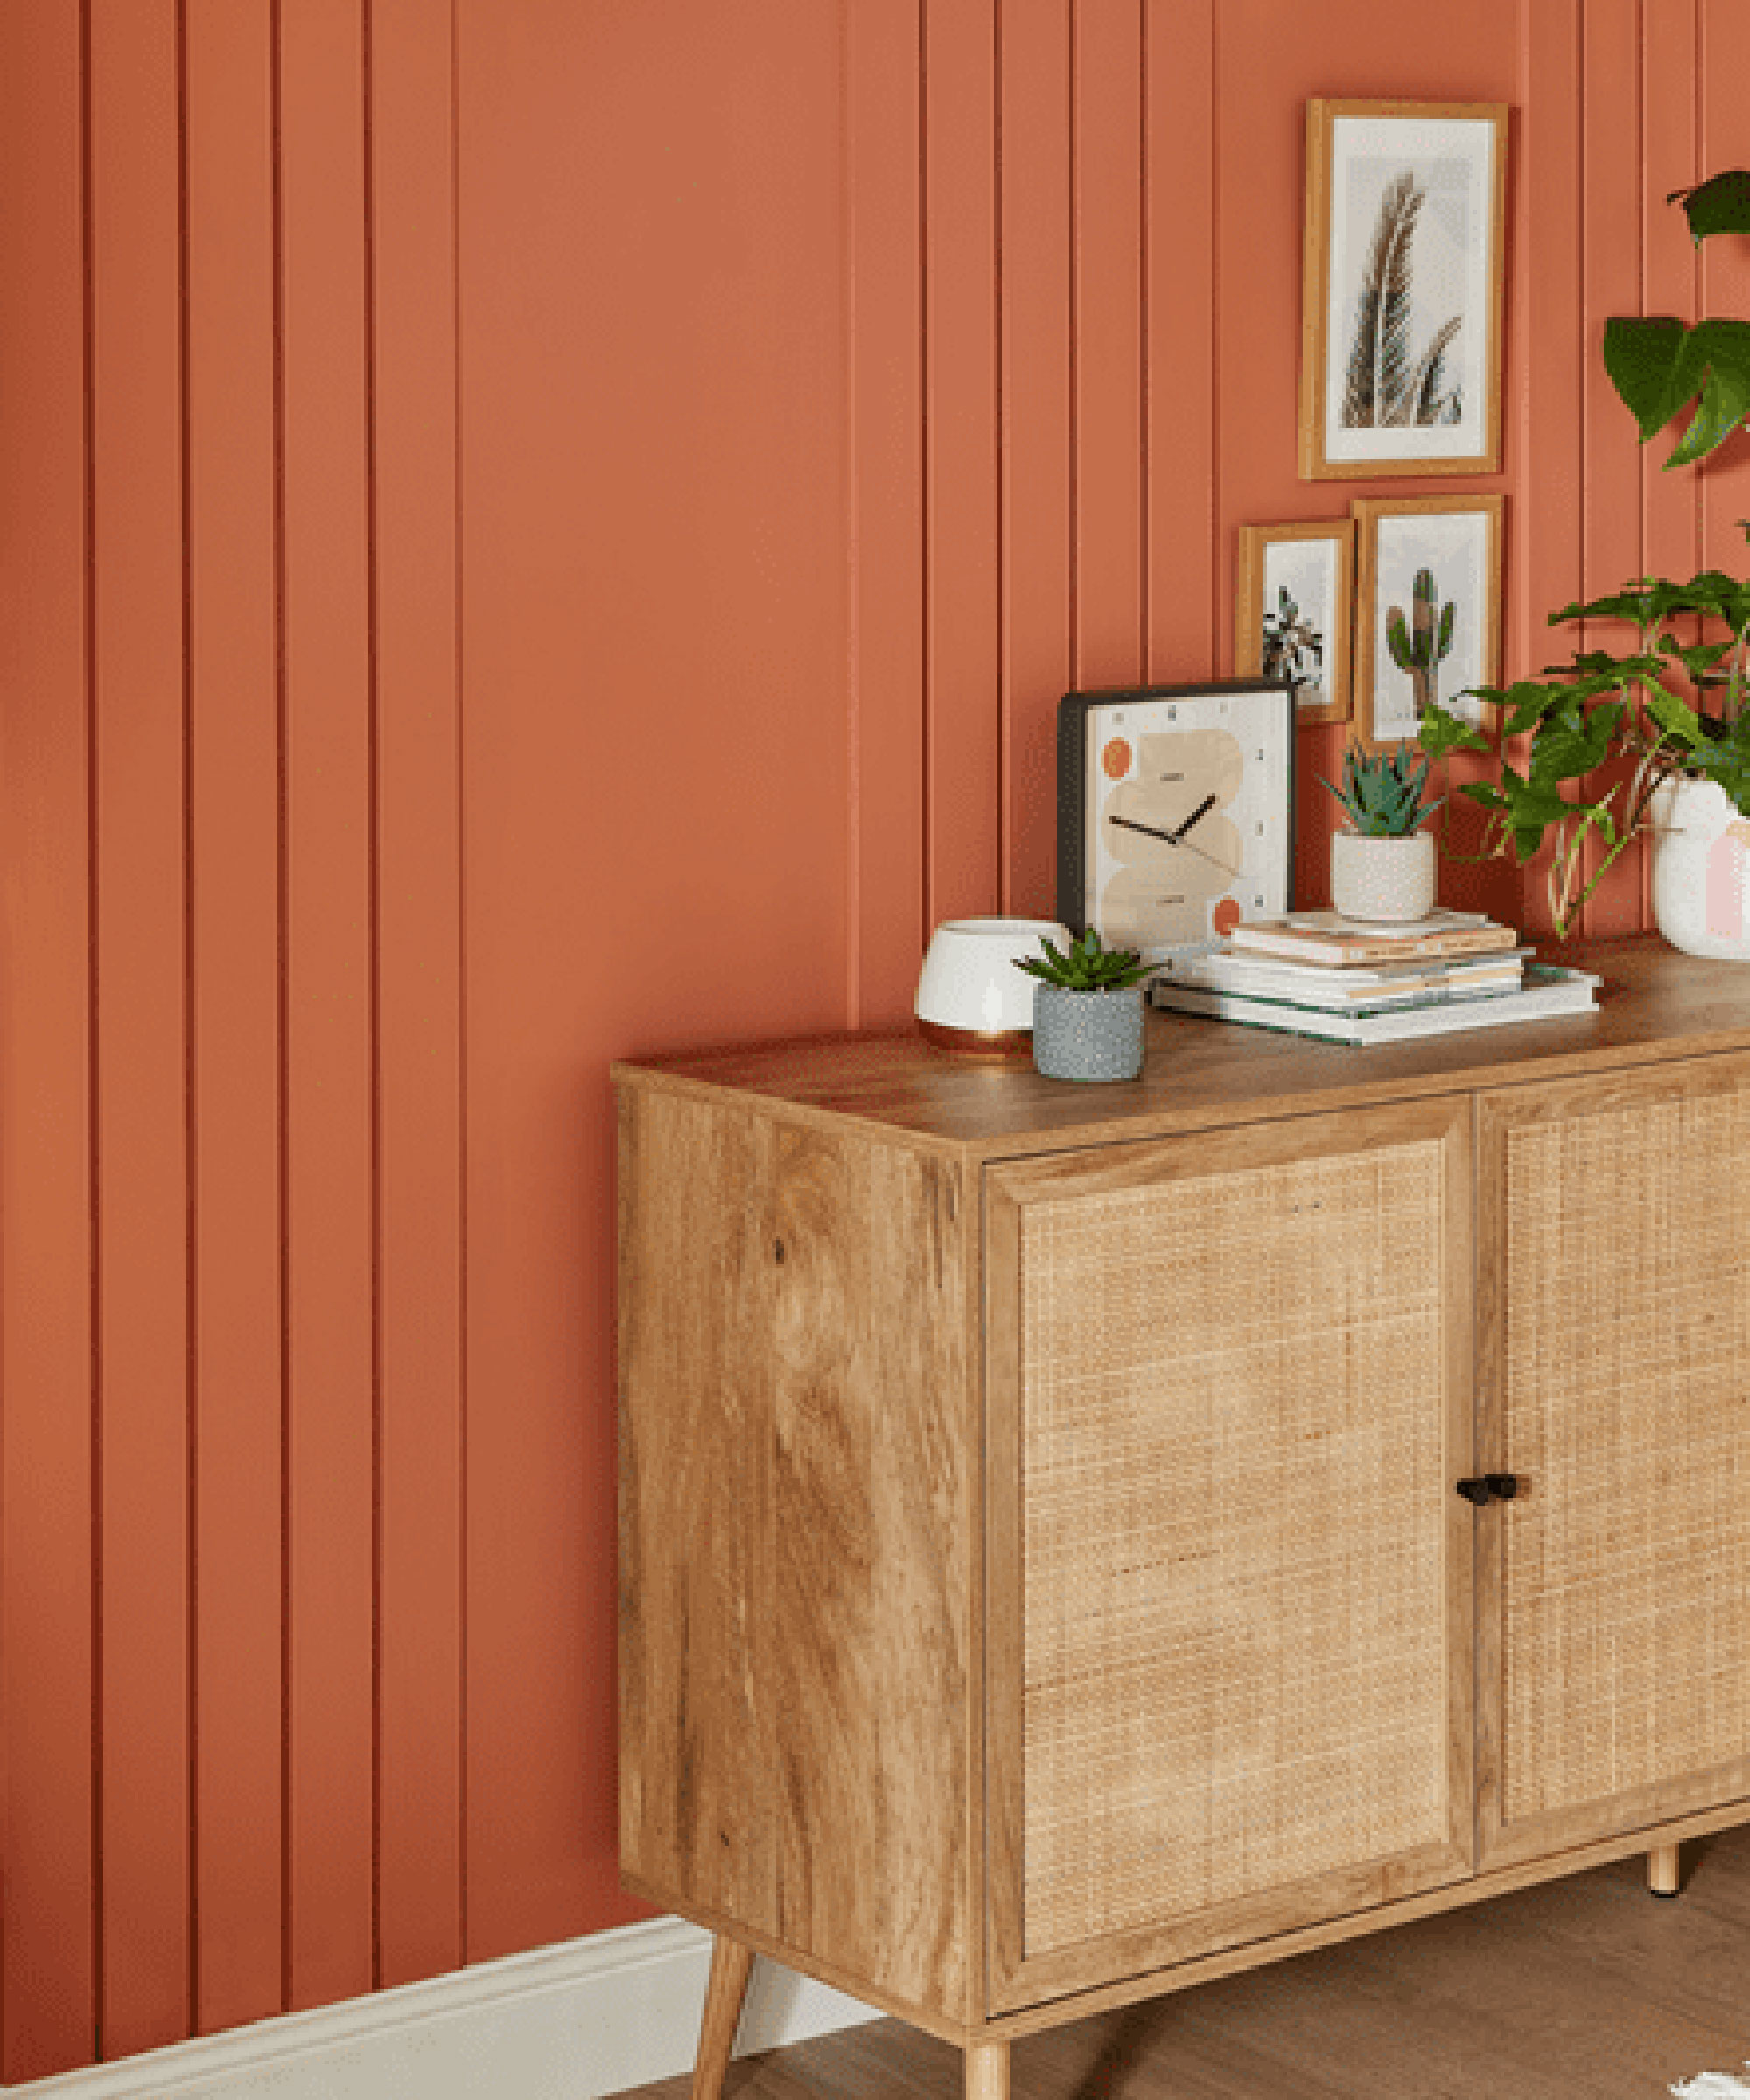
If you’re looking to make a contemporary style update to your guest room, a wood slat feature wall is an easy and effective solution.
Adding wood slat wall paneling to your home is a simple task – whether you’re a DIY novice or a seasoned pro. To ensure you stay on track, Homebase has put together this guide to show you how to build a wood slat wall, complete with instructions and the tools and materials you need.
You will need:
- Thin wooden slats
- Sandpaper
- Wood stain/paint
- Wall paint
- Liquid nails
- Brad nails
- 2 screws (for the spacer)
- Tape measure
- Sander
- Mitre Saw - cutting-edge equipment from big brands available on Amazon
- Jigsaw
- Brad gun
- Spirit level
- Paint rollers and tray
- Paintbrushes
- Floor covering
- Safety goggles
- Face mask
How to:
- Choose your wood slat panels: Decide on the width and texture of the wood slat wall panels you want to use. Pine will provide a beautiful finish and doesn’t have to be sanded extensively, whereas common board is a very affordable option that will look exquisite if you’re willing to put in the work. Top tip: Check that the wood slat wall pieces are as straight as possible. Also, try to find them in the exact size you want them – this will help you save time on having to cut them to your exact requirements.
- Measure and cut: Measure the height and width of the space you plan on installing your wood slat wall in. This will determine how many boards you need. Don’t forget to consider whether you want to create a space between each board – we’ll cover this off later!
- Not all walls/ceilings are level the whole way across, so measure the height of the wall roughly every 10-20 slats to ensure your panels will fit. Once you have your measurements, if needed, cut the wood slat panels to the correct length using a mitre saw. Wear safety goggles and a face mask when cutting wood. Top tip: Place your wood slat wall panels on the ground to work out the spacing you’d like between them. You can either have the boards directly next to each other or install with a space in between.
- Sand: Regardless of the type of wood panel slats you chose, sand them for a smooth, even finish. An electric sander is the most efficient, but you can also use sandpaper.
- Painting and finishing: Now it’s time to decide on your desired finish. If you plan to have gaps in between each panel of your wood slat wall, you could paint your wall a contrasting color to your chosen wood stain. If you have decided to stick your panels directly next to each other, then you could enhance the wood’s natural features with a simple stain. Or, for a more cohesive backdrop, paint the wall and panels the same color.
- Attach the first slat: Once your wall and panels are dry, it’s time to start building out your DIY wood slat wall. Apply liquid nails along the length of the back of the first wall slat and use a spirit level to ensure its level, before placing it against the wall. Then, use a brad gun to secure the slat into place at the top, middle, and bottom. Top tip: The combination of liquid and brad nails will ensure the wooden slats are as secure as possible.
- Create the spacer: If you want to have space between your slats, cut a spare slat to your desired width and attach two screws to the front of it – about a foot apart from each other. The screws on the front will give you something to hold onto as you use the panel as a guide for where to place each slat next.
- Repeat: Set the spacer against the first slat you attached to the wall, followed by placing the second slat against it on the other side. Repeat step 5 with the second slat, making sure the slats are pinched together, and then pull away from the spacer.
- Continue this process with the same spacer for the entire project. Keep the slats and spacer as close together as possible, to ensure you have a consistent gap between each. Top tip: Use a spirit level every couple of slats to ensure you are laying each wood slat how it should be and pinch together the slats and spacer to keep everything in line.
- Tackling tricky bits: If you encounter issues such as plug sockets, you can cut the wood slat panels into two pieces, so it fits. Or, cut a small piece out of your slat to fit around it, which can easily be done with a jigsaw.
10. Annie Sloan's breakfast in bed tray
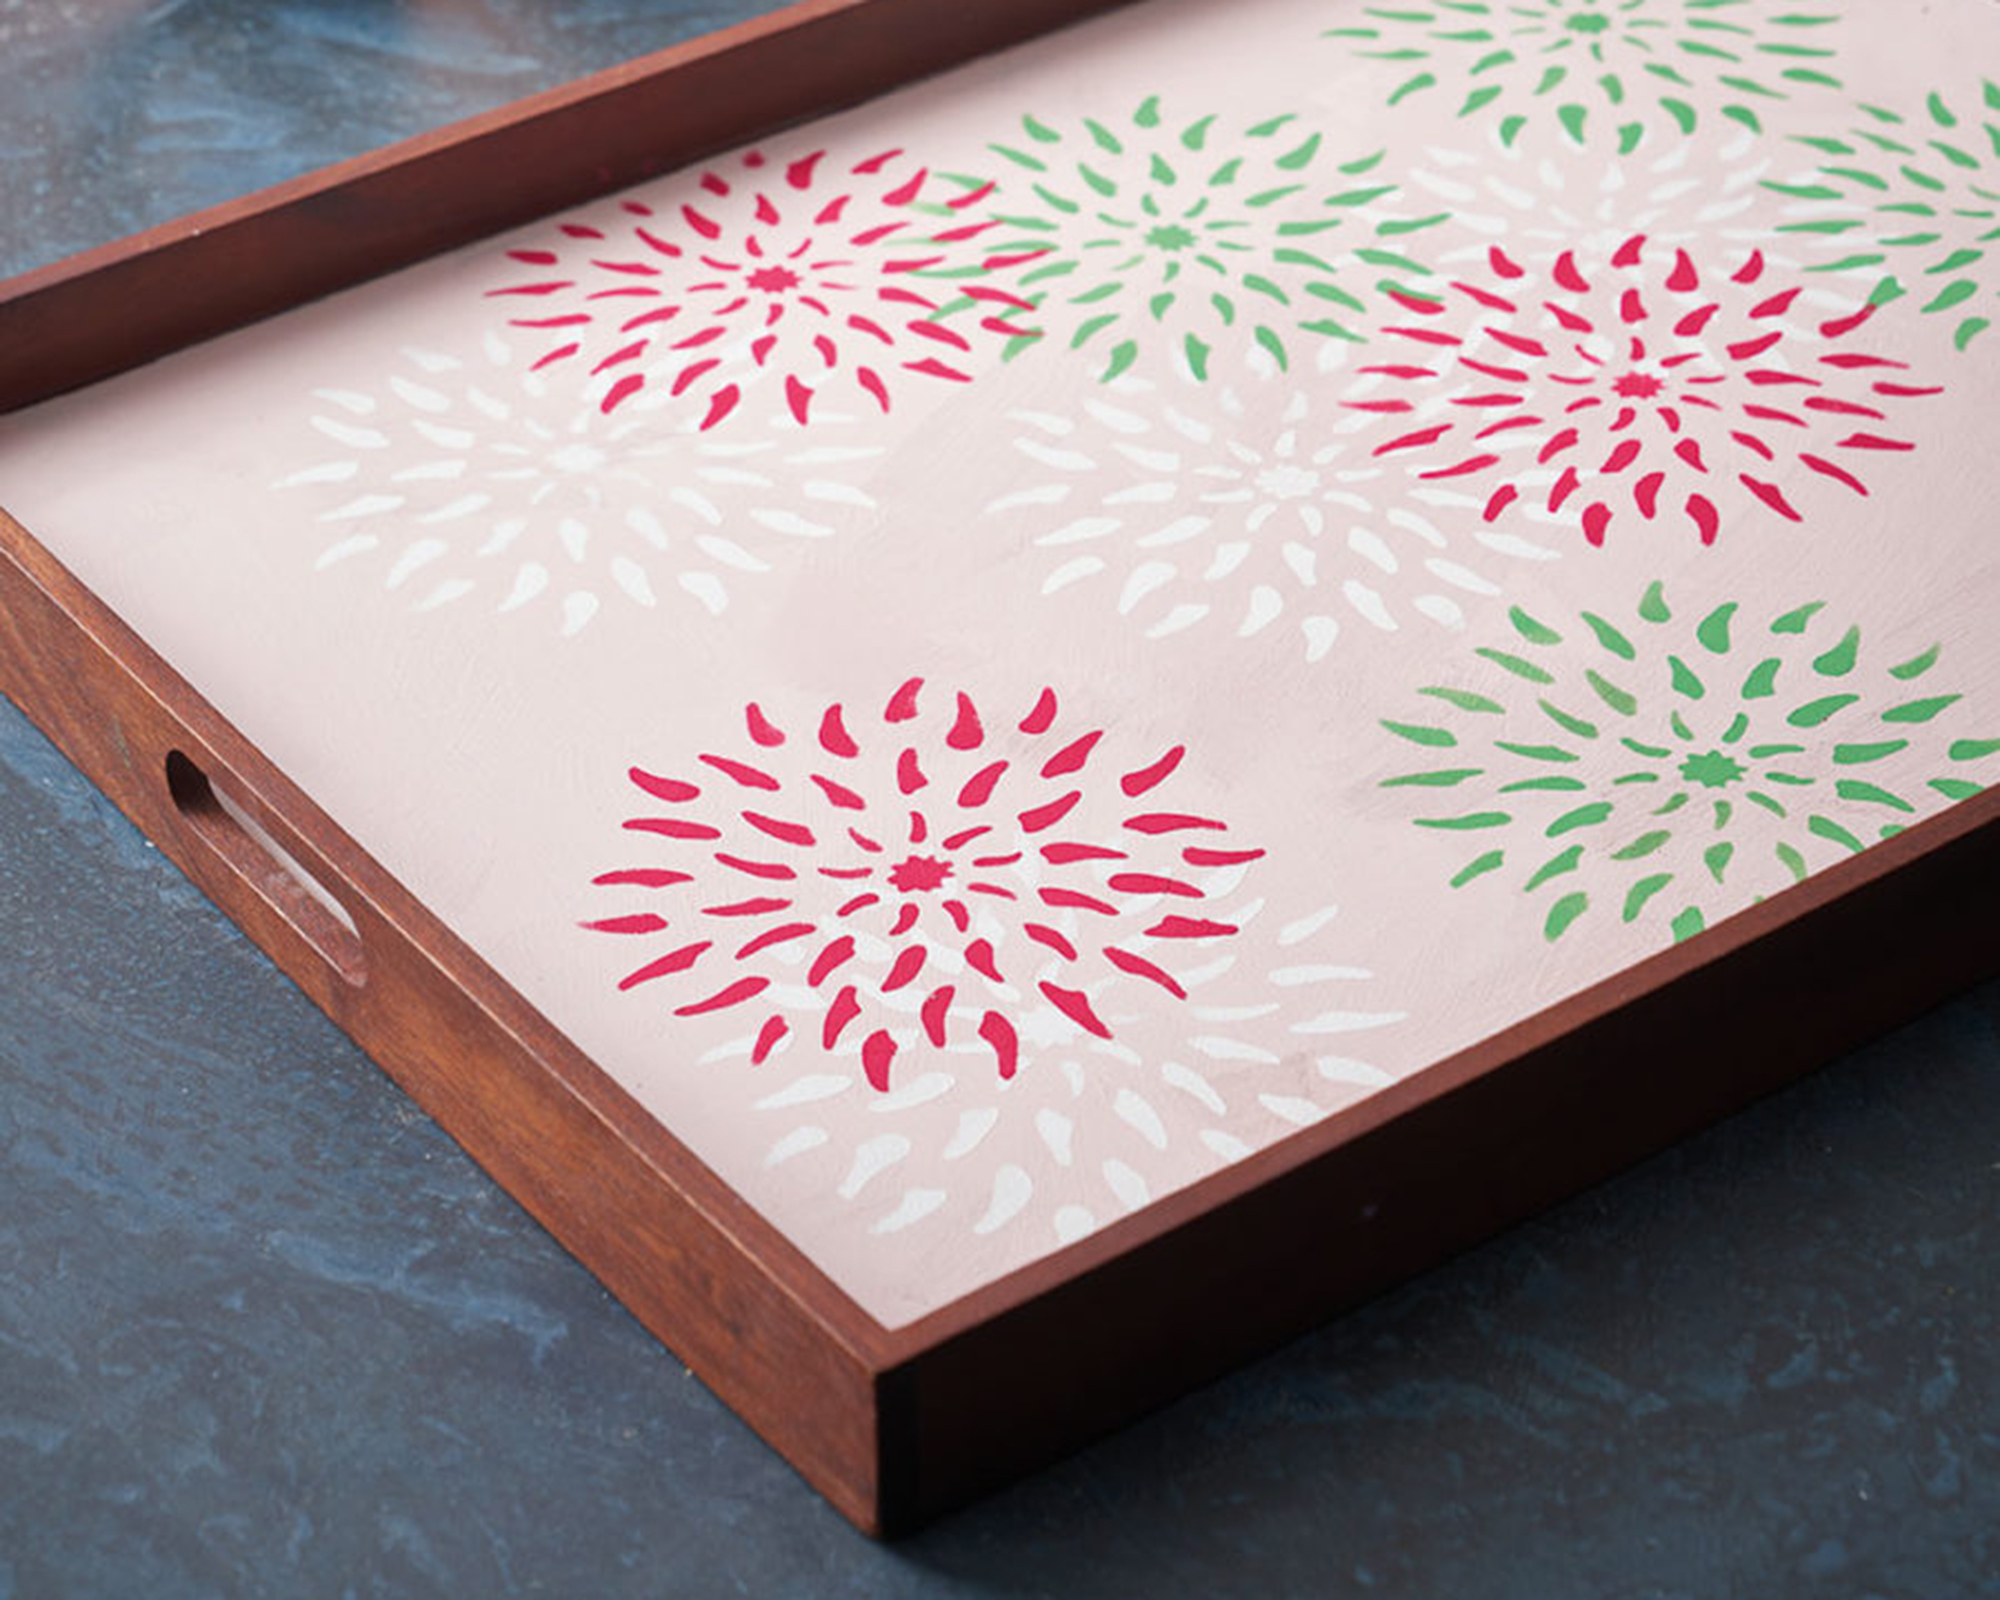
Make breakfast in bed even more of a weekend luxury by decorating your serving tray with romantic detailed stencil decor. Artist, color expert, and author Annie Sloan painted random, overlapping flowers to give an exuberant, joyful, naturalistic effect suggesting the abundance of wildflowers.
You will need:
- A wooden breakfast tray - if you don't have one, this light-hued one is a great choice
- Free stencil included with The Colourist Issue 6 or stencil of your choice
- Annie Sloan Chalk Paint® in Antoinette
- Annie Sloan Chalk Paint® in Capri Pink
- Annie Sloan Chalk Paint® in Pure
- Annie Sloan Chalk Paint® in Antibes Green
How to:
- First, Annie painted the tray using Chalk Paint® in Antoinette. This makes a wonderful base coat for the tonal complementaries of Chalk Paint® in Capri Pink and Pure. As is Annie’s signature style, she rounded out this harmonious color palette with tonal opposite Antibes Green for contrast.
- Annie free-painted the tray base using a small flat brush. The shape of this brush makes it perfect for achieving straight lines. If you are less confident in your brushwork, you can always mask the sides of the tray to keep them clean. Annie used two coats of this soft pastel pink as the wood of the tray was quite dark.
- Once your base coat is dried you can begin stenciling, using the roller. Pour Chalk Paint® in Pure onto your MixMat and run your roller back and forth through the paint to pick up enough product to render your design – but not so much that paint will “squidge” out from under the stencil and affect the outline. Several thin coats are better than one thick coat.
- Repeat at random over the base of the tray and then do the same using Chalk Paint® in Antibes Green and Capri Pink. Once the designs are dry apply two coats of Matt or Gloss Chalk Paint® Lacquer using a Small Flat Brush. This will give a robust finish.
11. Homebase's kids' room wooden space rocket table
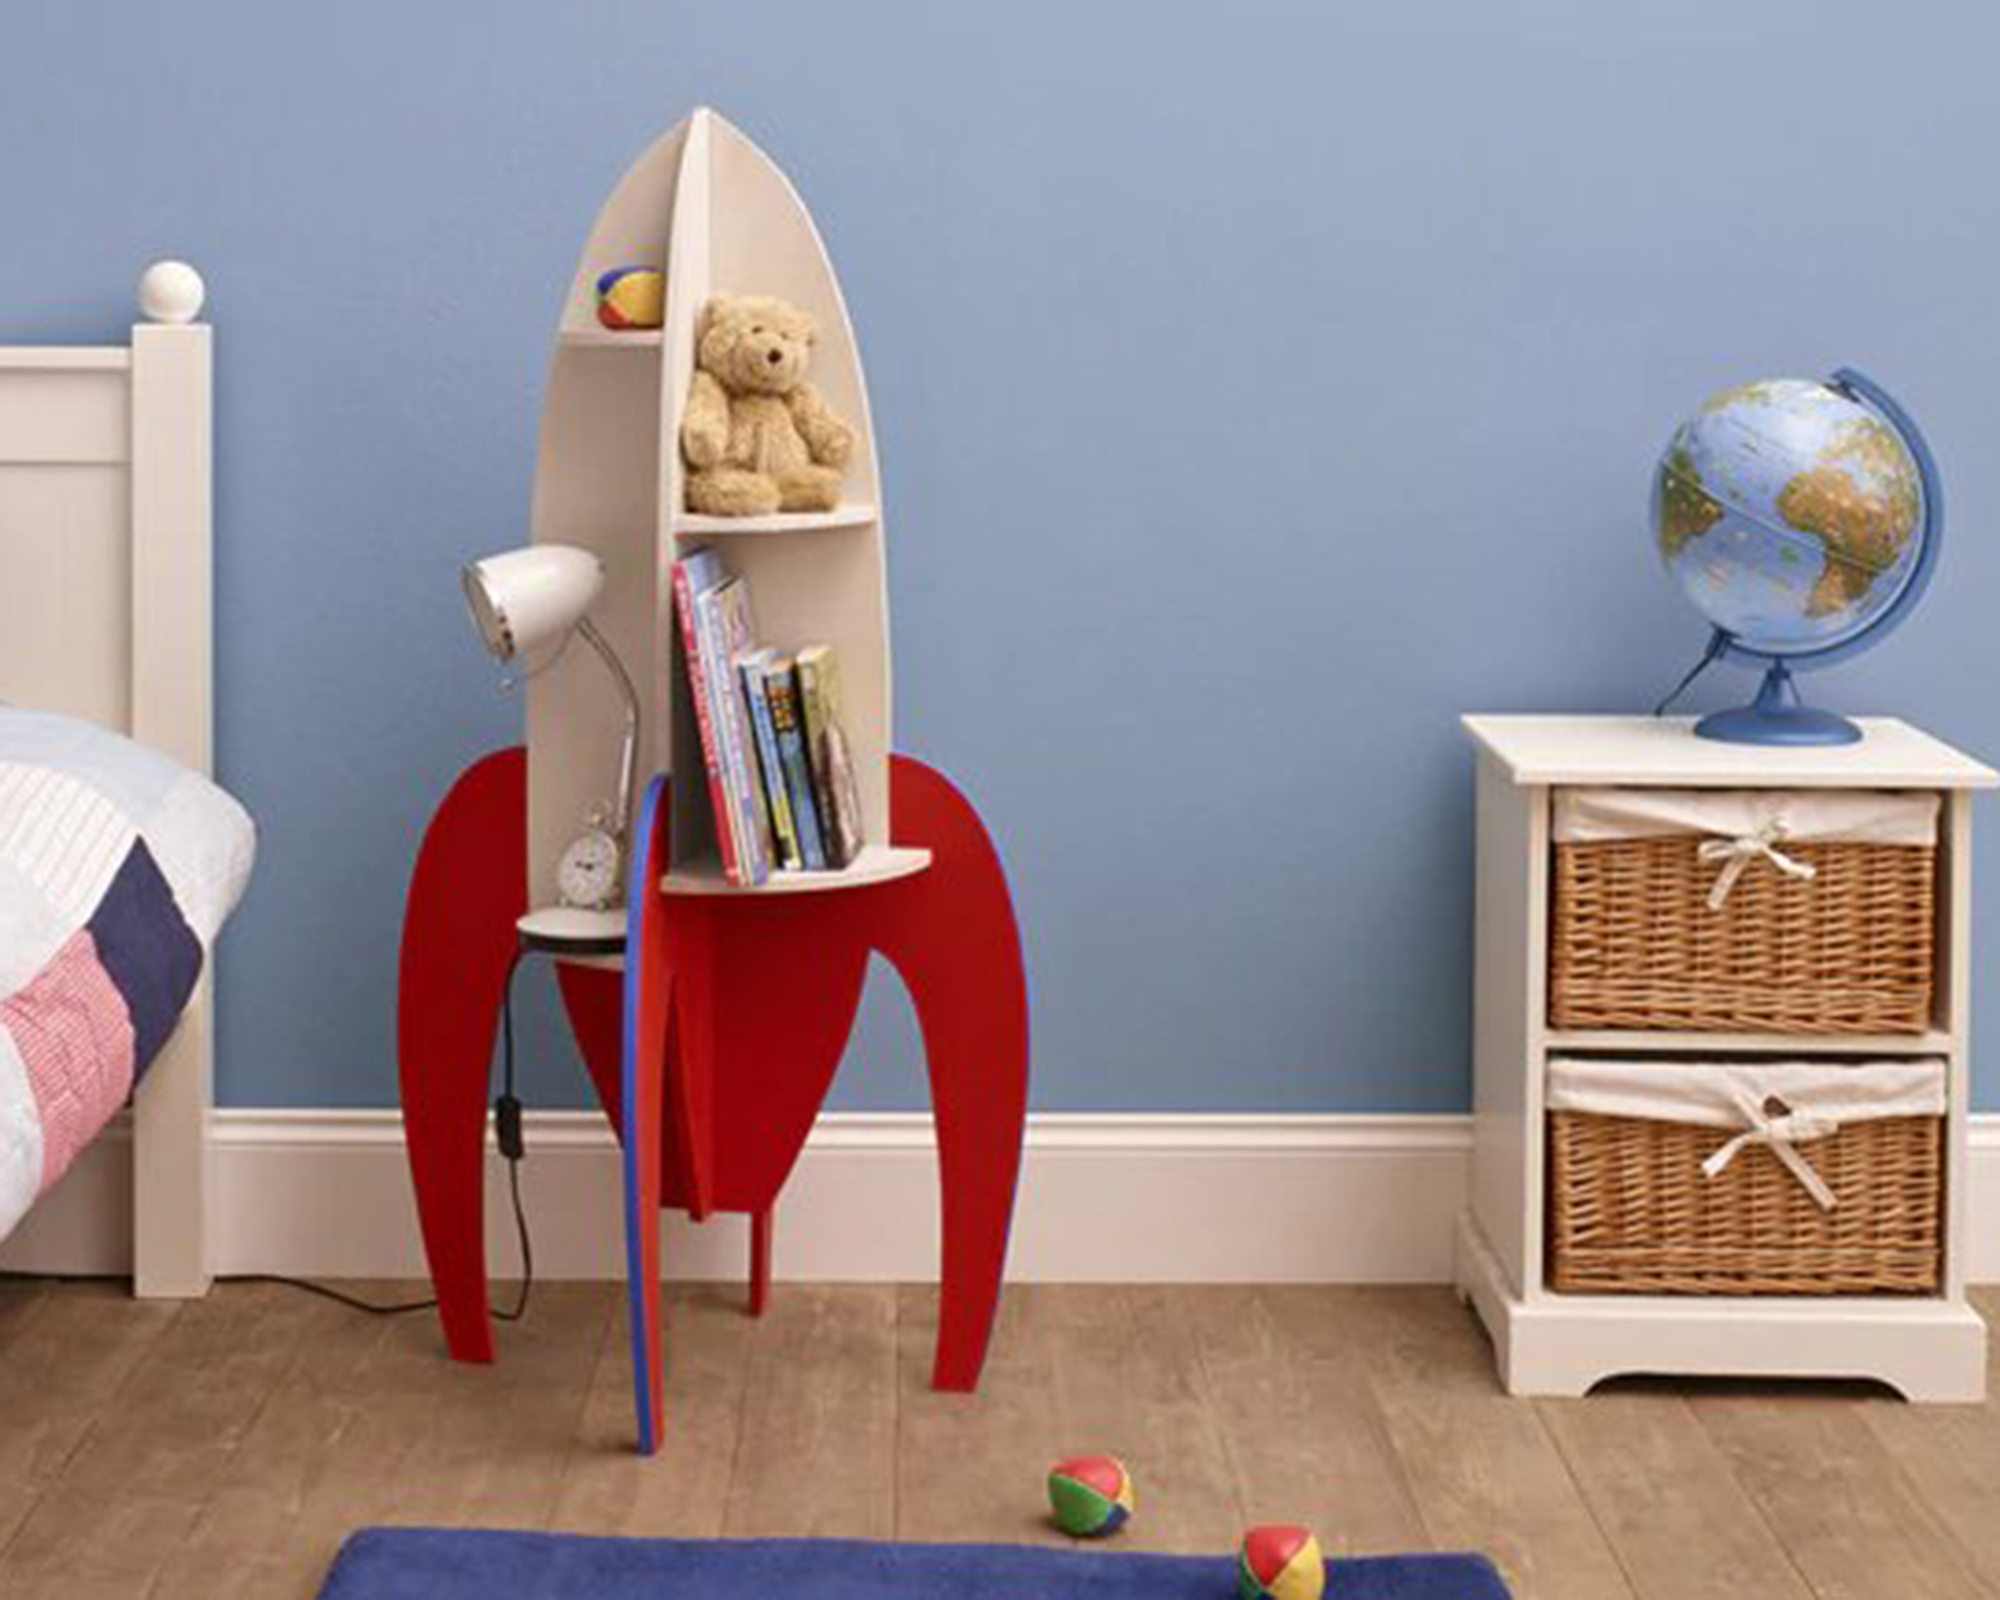
Whether it’s for the playroom or their bedroom, have a blast designing furniture for your children with our latest home project.
From jigsaws to sanders, all you need are some simple power tools and a spare weekend to create a fun, family-friendly table that the kids can love for years to come. This out-of-this-world DIY bedroom decor looks so professional, loved ones won't believe you made it yourself.
You will need:
- Black & Decker jigsaw - get one for under 30 bucks on Amazon
- Black & Decker circular saw - we always circle back to Amazon
- Black & Decker hammer drill - hammer time!
- Black & Decker sander - be a smooth operator with this tool
- Plywood board
- Masking tape
- Stanley knife
- Screws
- Compass
- Pencil
- 8 x pieces of A4 plain paper
- The best small printer
- Free downloaded space rocket stencil (available to download from Homebase)
How to:
- To make your life easier, Homebase has already designed a simple space rocket stencil ready for you to use. The stencil is A1 in size, which means that unless you’ve got a big printer or a local printing shop – you’ll have to print it out on 8 sheets of A4.
- With all your A4 sheets printed out, grab some masking tape and start sticking them together along each edge until you’ve got your whole stencil laid out and secured. Next, cut out your stencil on a chopping board with a sharp Stanley knife.
- Once your stencil is cut out, it’s time to turn to your large piece of plywood. Place your stencil on top, and repeat the pattern on your wood by drawing around it with a pencil.
- It’s power tool time, so clamp your plywood to a workbench, grab your jigsaw and start cutting carefully around the rocket template you’ve just drawn. It’s easiest if you start with the outside first before tackling the middle sections, otherwise, you can end up trying to cut thin, tricky pieces. Once it’s all cut, collect all your rocket pieces together.
- When it comes to building the wooden space rocket, the simplest place to start is the shelves on all four sides. We’ve decided to mix and match shelf heights to make it easier to store things of different sizes – so the shelves next to each other won’t be the same height, but those opposite each other will.
- Taking one of your half base parts (where the fins are), measure the width where you want your shelf to go with a compass. Then, without moving the compass, move it to a spare piece of plywood and use it to draw an arc around a corner (making sure it’s 90 degrees) – giving you the perfect shelf size. Repeat for your other seven shelves, and then pick up the power tools again and use your jigsaw to cut them out.
- Once your shelves are assembled, take the opportunity to sand them down before going any further. In fact, sand the whole rocket and pieces until they’re nice and smooth to save you from splinters and make painting a whole lot easier later on.
- Next, we need to mark up all our spacings and drill points. Take your full rocket piece and place one of the half pieces on top so you’ve got a straight line down the middle. Mark this line with a pencil, then flip the half piece over and do the same with the other side. If you’ve done it right, you should now have a thin strip of about 12mm marked down the center of your biggest rocket piece.
- Place your shelves where you plan to put them, up against the middle strip – then draw a horizontal line across the shelves’ top edge. Working backward from the top edge, make two marks 6mm underneath, and 30mm from the shelf ends to work out where to drill. Then repeat for all your other shelves.
- Using 30mm screws, put a 3mm drill bit and drill pilot holes through the pencil marks you’ve made on your wooden space rocket. Then line up your first shelf’s top edge with the line you marked and drive your screw through both pieces of plywood. Continue the same steps for your other shelves, using them to join the base units together at the same time. Top tip: When you’re joining the halves of your rocket together, make sure the top and bottom of your rocket line up evenly, otherwise it’s likely to fall over when you’ve finished.
- With your wooden space rocket finished and all the shelves attached, there’s only one thing left to do – give it the personal touch with a splash of color. Pick your perfect shade and get painting, leaving time for it to dry before moving it.
12. Cricut upcycled jewelry tray
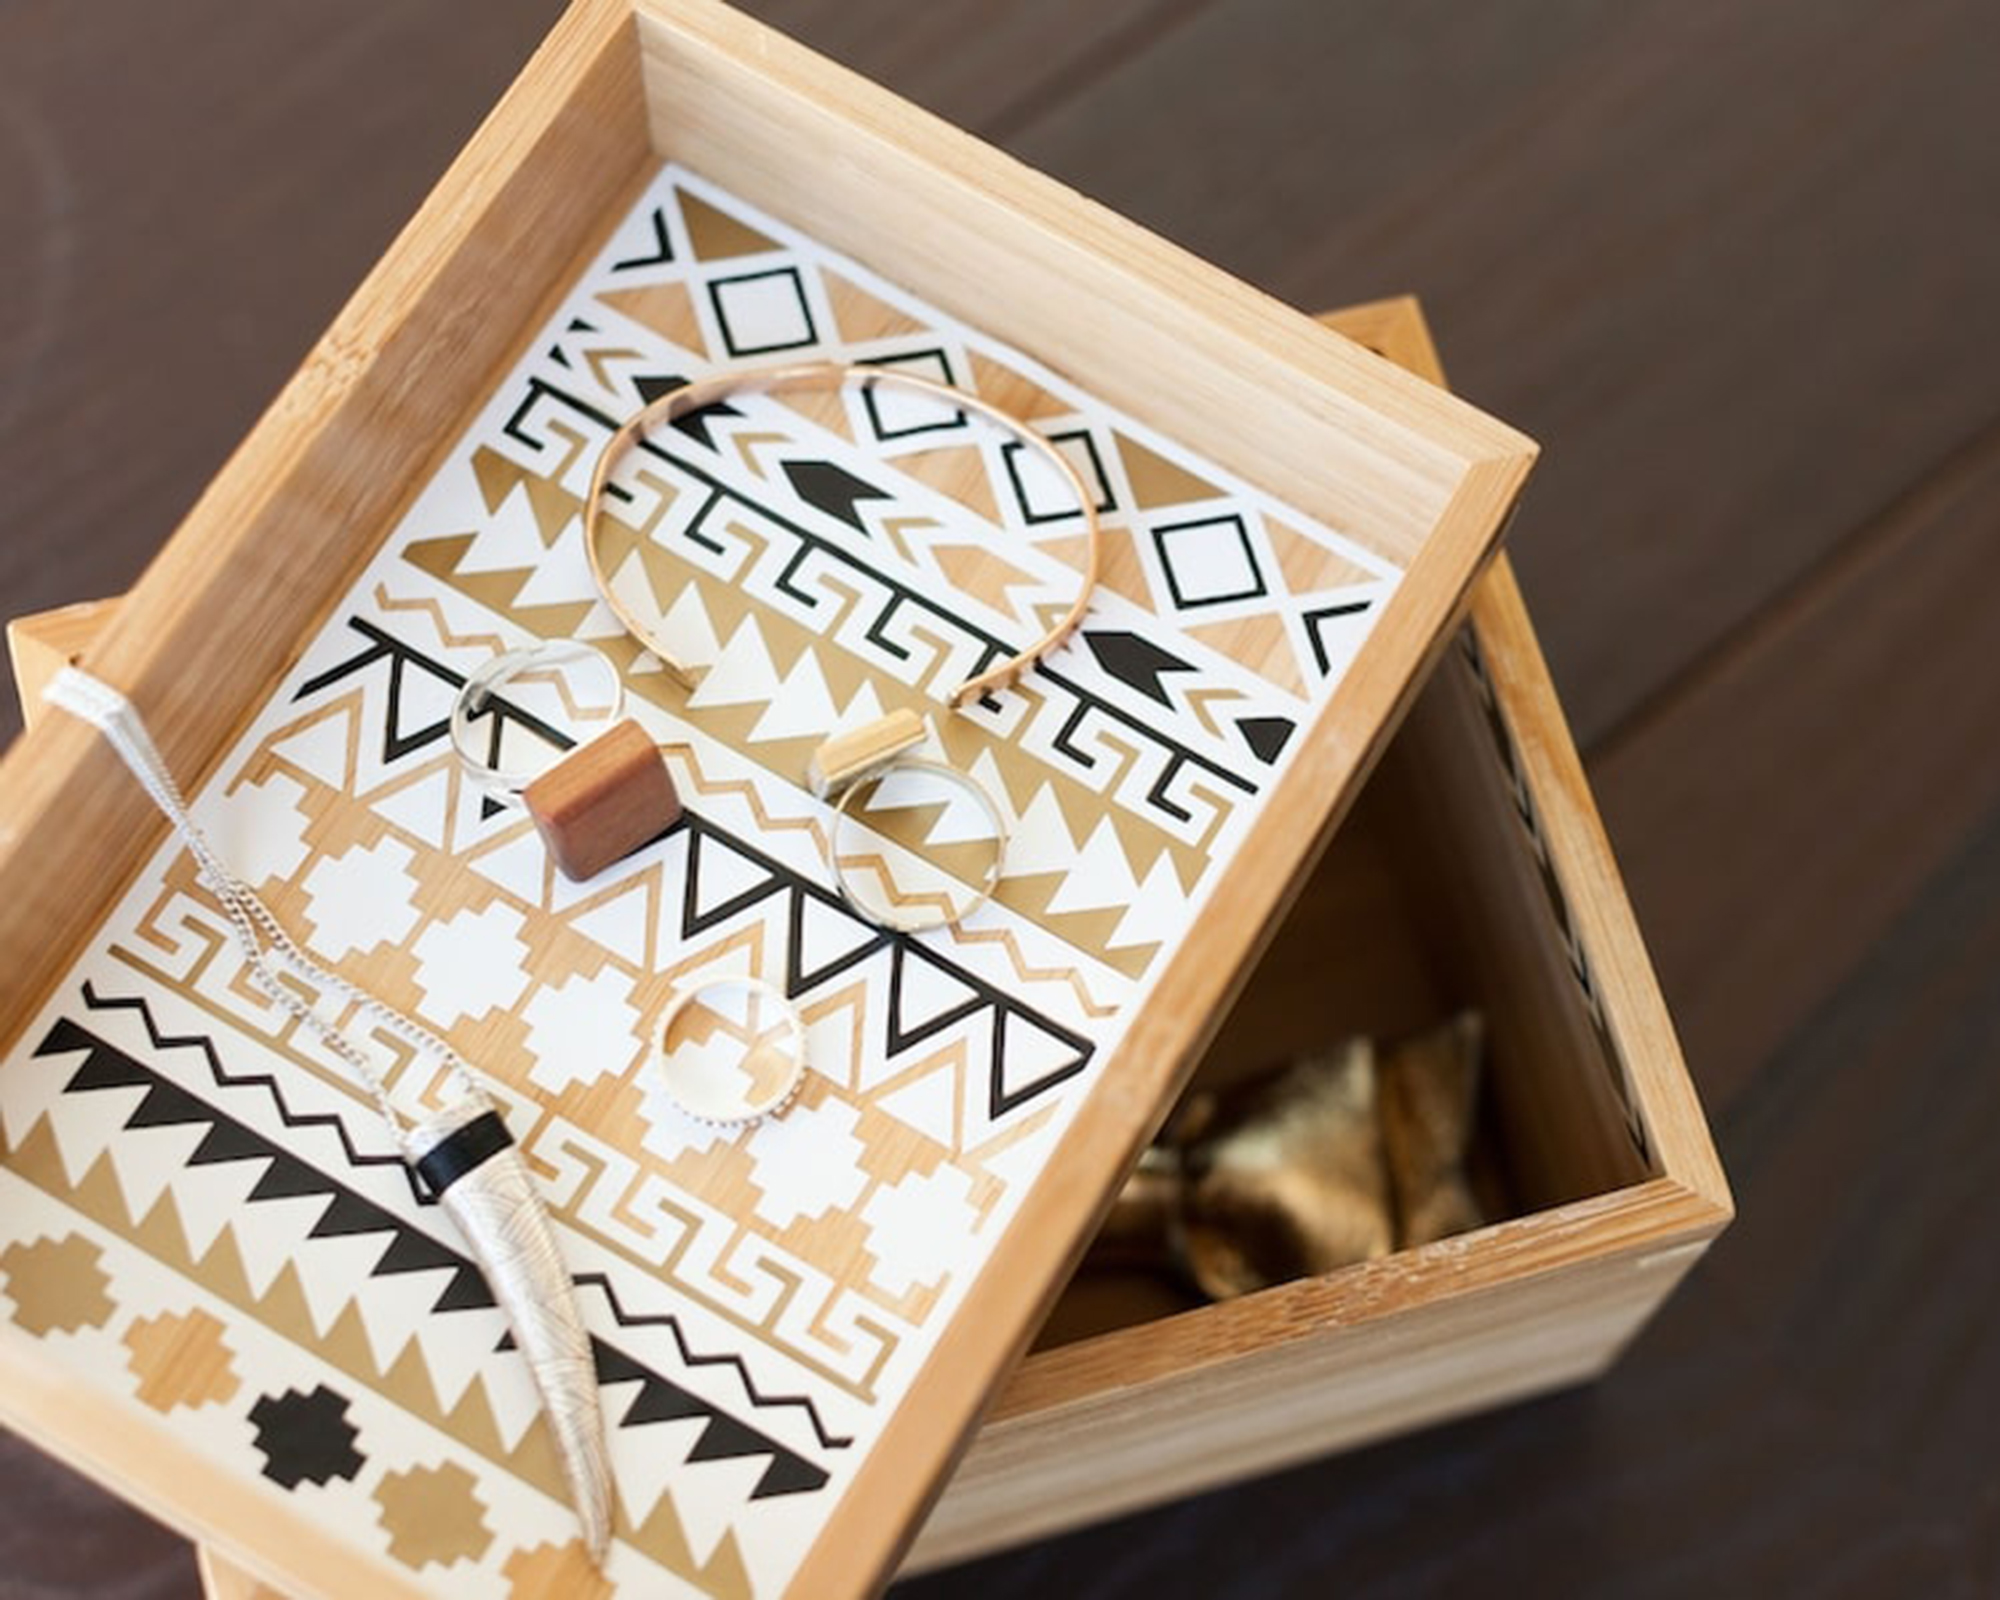
- Cricut gold and silver vinyl roll
- Cricut midnight vinyl roll
- Cricut standard grip machine mat
- Cricut transfer tape
- Cricut weeder
- Cricut scraper
- Jewelry box
- Cricut machine - choose from the Cricut Joy, Cricut Maker 3, Cricut Explore 3
- Cricut Design Space® app
How to:
- If you want to alter the project, select Customize, then use the tools in the Edit panel to make changes before you cut.
- Follow the prompts in Design Space® to cut the images from the vinyl.
- Remove the unneeded pieces of vinyl using a Weeder Tool. It is usually easiest to move from the inside out when weeding.
- Use Transfer Tape and your Scraper Tool to apply the vinyl cuts to your project. Make sure the surfaces you plan to adhere to are clean and dry. Top tip: If you have never used vinyl before, check out the links below in the 'More Help' section.
- Apply vinyl in the same order it appears in the Layers panel in Design Space, starting from the bottom layer and working up.
13. Isabelle Strambio's macrame playhouse
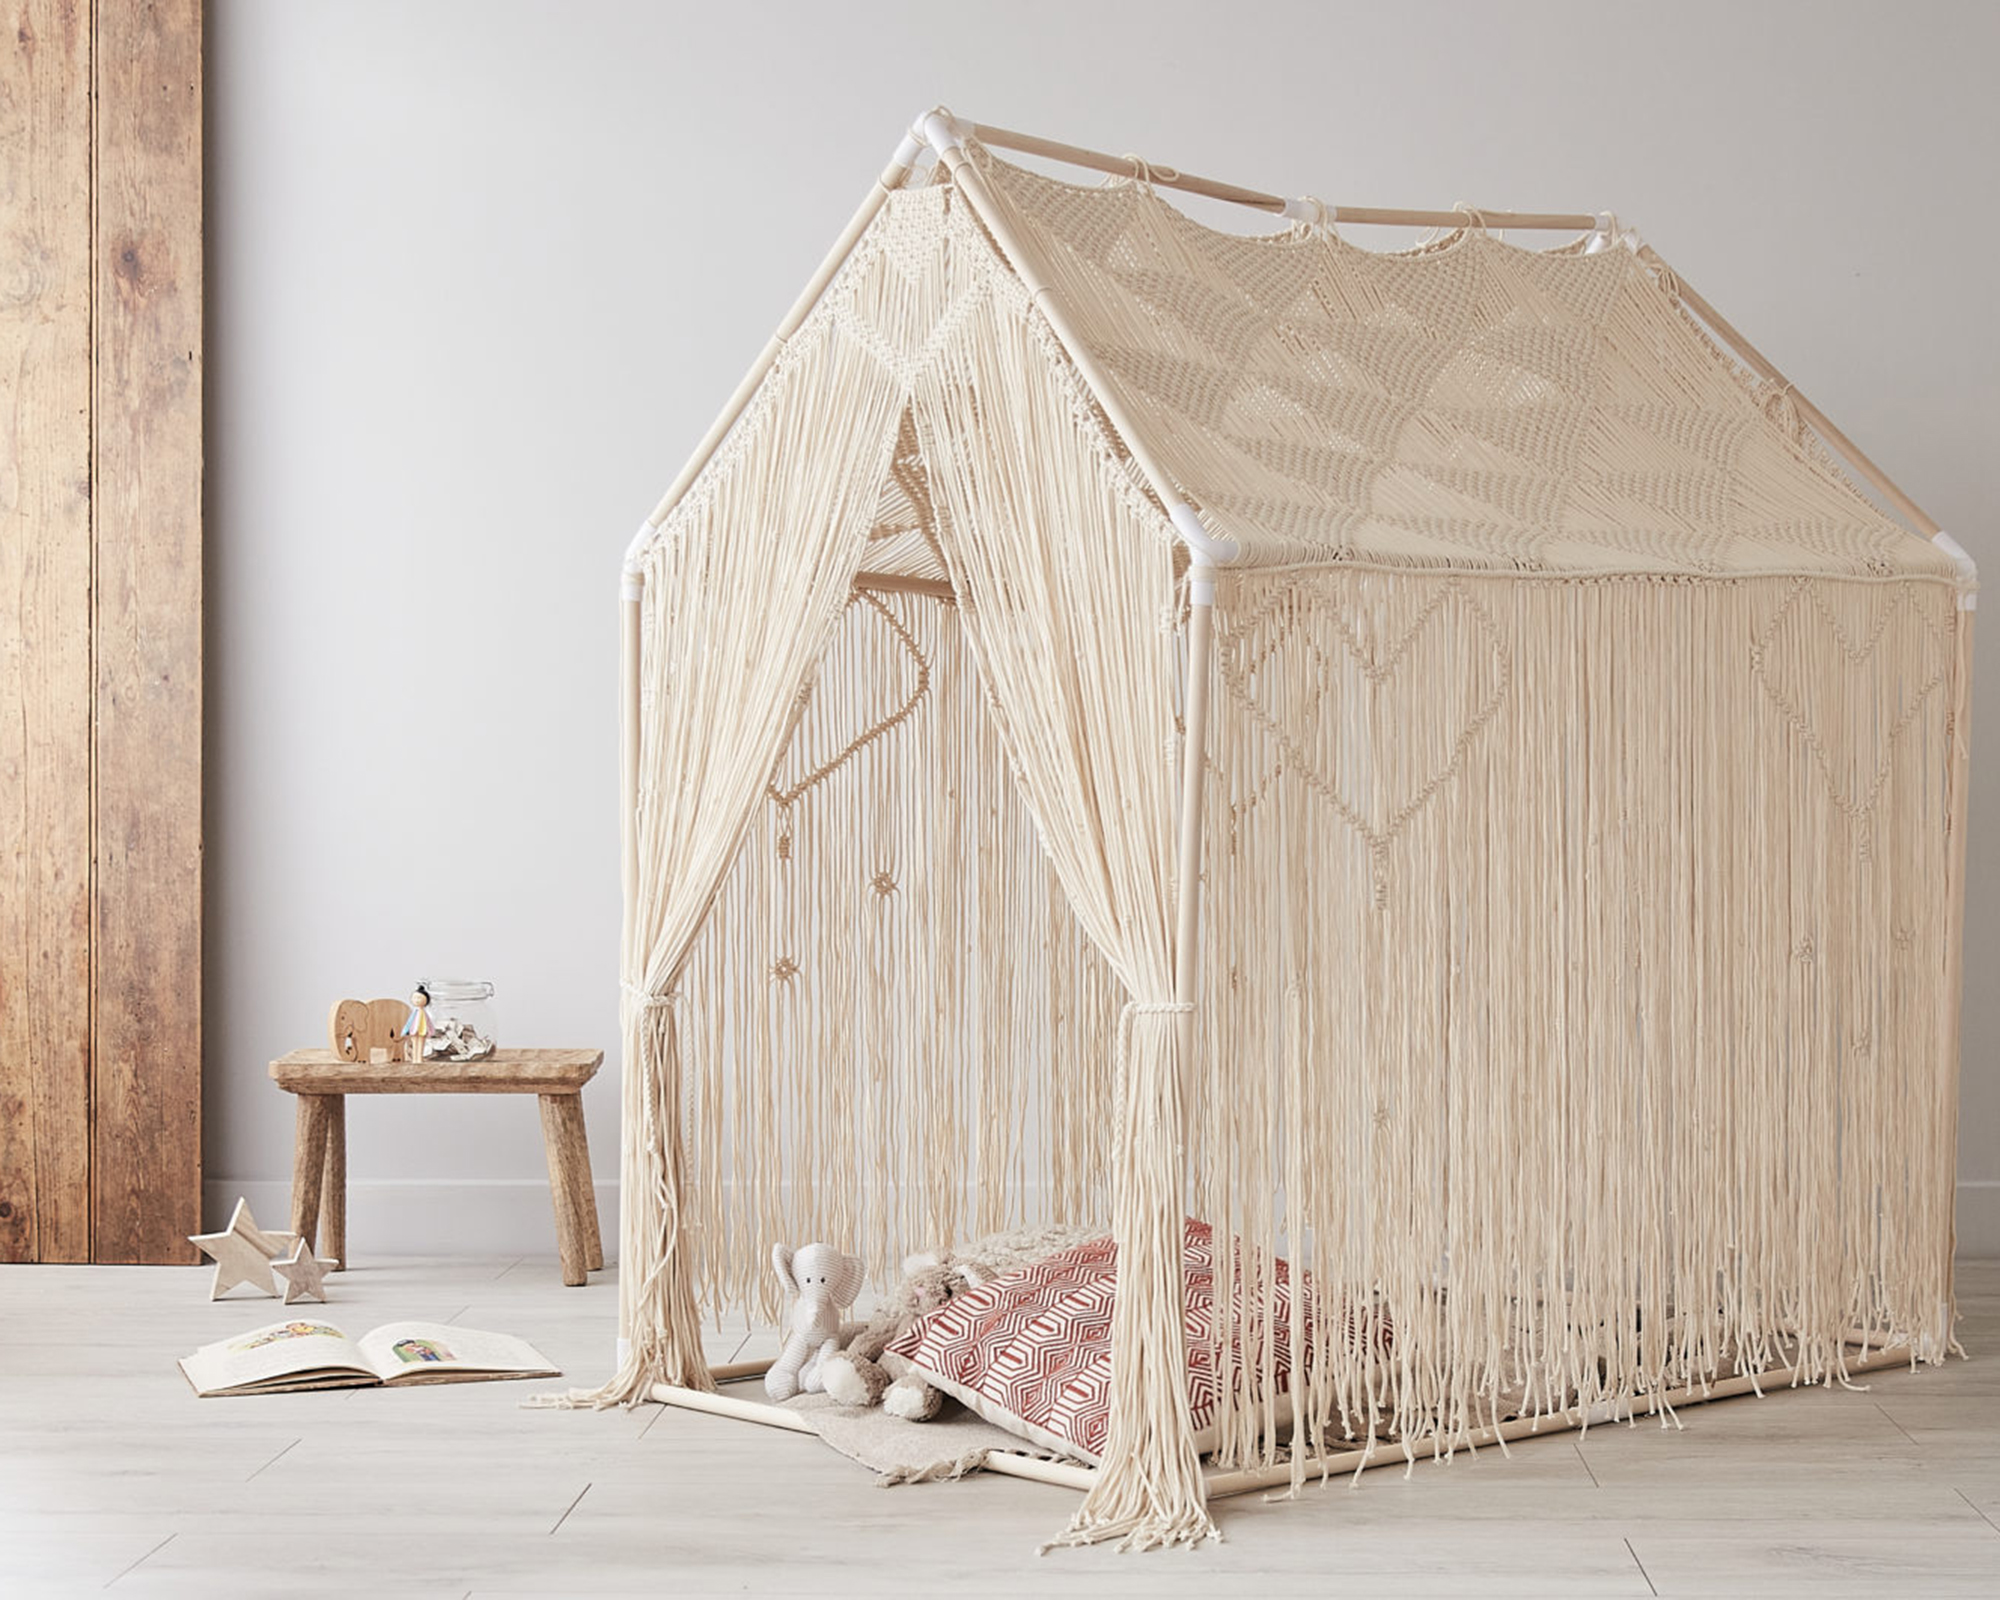
There's no better way to make your children’s playtime more exciting than by creating this macramé playhouse by artist Isabella Strambio aka @_twome. Your children will be delighted to have their own little den to enjoy their playtime in.
There are various designs that you can incorporate into your macramé playhouse to make it not only great for children to play in, but also wonderful for your home décor...especially when it costs under $50 to make.
She says: 'To make this beautiful macrame playhouse I have used over 1800 meters of strings and spend 40 hours on it, but it’s totally worth it and the kids LOVE playing with it in the house or outside in the garden. I am also imagining it at Chritsmas all decorated with fairy lights and mistletoe by the opening. Very Instagrammable!'
Watch Strambio's Instagram reel or use the visual guides on Hobbycraft for in-detail imagery.
You will need:
- Hobbycraft general purpose scissors 21.5cm
- Hobbycraft hemline metric and imperial tape measure 150cm
- Hobbycraft wooden den kit 80cm x 125cm
- Hobbycraft knitcraft ecru return of the mac yarn 200g
Initial preparations:
Before you start with the main steps, you'll want to prepare first with these before proceeding.
- Build the structure: first, build the wooden playhouse according to the instructions.
- Prepare the macrame yarn: Then, prepare the following cut pieces: Cut 2 sets of 'large sides' (1 x 1.7m, 112 x 5m, and 1 x 2m). Cut 2 sets of 'small sides' (1 x 2.1m, 10 x 5m, 40 x 3.5m, 48 x 2.5m and 8 x 3m). Finally, cut 2 sets of tie-backs (3 x 1.2m).
How to:
- Large side step 1: Take the 1.7m string and secure it at both ends on the wooden den top dowel. Place all 112 strings on it using the Lark’s Head Knot. For every 28 strings, use a 15cm piece of string to secure the 1.7m string on the dowel.
- Large side step 2: You will work in sets of 28 strings (56 strands). Take the first 28 strings and make a row of Square Knots.
- Large side step 3: Continue making decreasing rows of Square Knots until you have one knot and have created a triangle of square knots.
- Large side step 4: Repeat with the remaining strings to tie a total of 4 triangles.
- Large side step 5: Next tie a new triangle of Square Knots, in between the triangles in the first row.
- Large side step 6: Repeat with the remaining strings to tie a total of 3 triangles.
- Large side step 7: Repeat 'Large side steps 2-6' until you have 5 rows of triangles of Square Knots.
- Large side step 8: Take 2m string and secure at both ends of the wooden den corner dowels, under the white plastic connector. Tie all the strings on it using the double half hitch knot.
- Large side step 9: Divide the strands of strings into 76-72-76 sets. With the help of some spare string bundle together the two sets of 76 strands. You will start working with the 72 strands in the middle.
- Large side step 10: Tie a row of Square Knots with the 72 middle strands, just below the line of double half hitches. Add barrel knots at random on the strings. This central panel can be used as a door to the den.
- Large side step 11: Take the first set of 76 strands. Count 16 strands starting on the left and tie a Square Knot. Then, count 16 strands from the right to left and make a square knot.
- Large side step 12: starting from the first Square Knot on the left, tie a diagonal line of 8 Square knots going towards the left.
- Large side step 13: Next tie a diagonal line of Square Knot going towards the right.
- Large side step 14: Repeat Steps 12-13 with the second Square Knot. Join in the middle with a new square knot.
- Large side step 15: Tie a sinnet of 2 Square Knots below the last knot on the left and right. Tie a diagonal line of 18 Square Knots going towards the center.
- Large side step 16: Join with a sinnet of 2 Square Knots. Next tie a sinnet of 3 Square Knots, 2cm below, swapping the working and filler strings. You have made one of the heart-shaped windows.
- Large side step 17: About 5cm below, count 12 strands from the left, make a diamond of Square Knots. Repeat on the other side. Finally made one in the middle about 15cm below the heart-shaped window. Repeat steps 11-17 with the remaining strings. Trim the strings at the bottom.
- Small side step 18: take the 2.1m string and secure it below the white plastic connector at the top with 2 pieces of 15cm string.
- Small side step 19: secure the ends using the white plastic corner connector.
- Small side step 20: tie 10 x 5m string at the top using the Lark’s Head knot.
- Small side step 21: Tie 5 rows of alternating Square Knots. Then tie 4 rows of Decreasing Square Knots.
- Small side step 22: next tie 20 x 3.5 strings on the main string on the left, using the Lark’s Head Knot. Secure the main string on the dowel with 15cm pieces of string. Add 24 x 2.5m of string using the Lark’s Head Knot. Secure the main string on the dowel with 15cm pieces of string. Finally, add 4 x 3m of string using the Lark’s Head Knot. Repeat on the right side.
- Small side step 23: tie 2 rows of alternating Square Knots, parallel to the diagonal dowel, using the new strings.
- Small side step 24: Next you need to join the central part with the two sides. Take strings #3 & #4 from the last Square Knot on the diagonal side and strings #1 & #2 from the first square knot on the central part on row #5. Tie a Square Knot.
- Small side step 25: below this Square Knot, tie two diagonal lines of 4 Square Knots going the opposite way. When you are going towards the left, use two strings from the previews knot and two from the knot on the left side, only use strings #3 & #4, tuck the other two at the back. Keep your knots horizontal.
- Small side step 26: repeat on the opposite side. Then close the heart shape, with two diagonal lines of 11 Square Knots and a final Square Knot to close the two lines. Keep your knots horizontal. Add another line of diagonal Square Knots below.
- Small side step 27: add a third row of alternating Square Knots, on the two sides parallel to the diagonal dowel.
- Small side step 28: use the first 4 strings and make 4 sets of 3 sinnets of Square Knots, alternating the workings and filler strings every time. Repeat on the opposite side. Take the middle 8 strings, split them into 2 groups, and with each set make 8 sets of 3 sinnets of Square Knots, alternating the workings and filler strings every time. Add Barrel Knots at random on the other strings. Trim the strings at the bottom.
- Tie back step 29: take 3 x 1.2m strings, tie a single knot at the top leaving a tail of about 5cm.
- Tie back step 30: tie a braid 60cm long.
- Tie back step 31: tie a single knot at the top leaving a tail of about 5cm. Use it to tie the front or side door curtains.
How can I decorate my bedroom DIY?
'Including organic materials like wood, leather, and stone in your bedroom accessories is a great way to continue the natural flow of the boho bedroom theme.' says Rebecca Marie, marketing team member and crew demonstrator, Cricut.
'Organizing with wooden trinket dishes, cubbies, and benches can optimize both the function and form of your space. Organic materials can also be adorned with vinyl accents for a unique touch.'
How to DIY industrial bedroom decor
'When it comes to furnishing your industrial bedroom, the trick is to transform old DIY junk into new practical furniture,' says Karen Yu, marketing and product strategy manager of Zinus.
'DIY supplies like stepladders, toolboxes, shipping crates, and sawhorses can all be repurposed for an industrial bedroom. For example, you could buy an old sawhorse for cheap on eBay and use it as a clothing rack.'
'Old working stepladders, complete with paint blemishes, make for a good shelf for displaying your bedroom plants whilst giving the room that industrial, worked-in feel. A shipping crate can make a handy stool. You might have some of this in a garage already, if not ask family and friends if they have any spares. Toolboxes can make for handy bedside or below-the-bed storage.'
Join our newsletter
Get small space home decor ideas, celeb inspiration, DIY tips and more, straight to your inbox!

Hi, I'm the former acting head ecommerce editor at Real Homes. Prior to working for the Future plc family, I've worked on a number of consumer events including the Ideal Home Show, Grand Designs Live, and Good Homes Magazine. With a first class degree from Keele University, and a plethora of experience in digital marketing, editorial, and social media, I have an eye for what should be in your shopping basket and have gone through the internal customer advisor accreditation process.
-
 6 small living room DIY projects — inspired ideas from an interior designer
Does your small living room need a refresh? These 6 small living room DIY projects will have your living room serving looks
By Aida M. Toro Published
-
 The TEMPUR-Adapt mattress topper is a dreamy combo of cushion and support
Our contributing editor reviews the TEMPUR-Adapt mattress topper for two weeks in her home
By Paige Cerulli Published
-
 What is the happiest color for a small bedroom? Here's what experts recommend for a dopamine boost
What is the happiest color for a small bedroom? Paint experts from Benjamin Moore and Sherwin-Williams spill
By Danielle Valente Published
-
 How to make a small bedroom cozy — designers reveal their non-negotiable rules
Our edit of how to make a small bedroom cozy features designer-backed tips and items to help achieve the look
By Danielle Valente Published
-
 The Urban Outfitters bedding sale makes me want to cancel my Friday night plans
You'll find everything in the Urban Outfitter's bedding sale including pillows, shams, buttery blankets, and cozy comforters
By Christina Chrysostomou Published
-
 How to make a bed more comfortable — without buying a new one
Sick and tired of your bed being uncomfortable? Check out our guide for simple tips and tricks to making the coziest bed ever
By Beth Mahoney Last updated
-
 The freestanding bath in this dreamy bedroom is sheer five-star luxury
Emma and Martin wanted a suite just like in an upscale hotel — mission totally accomplished.
By Ellen Finch Published
-
 Bedding in a bag for people who hate buying sheets separately (it's me, I'm people)
These bed-in-a-bag sets make it easy to choose sheets for any bed. Shop these sets with pillowcases, top sheets, fitted sheets, and more
By Louise Oliphant Published